智能文章系统实战-统计数据展示Pyhton版本(17)
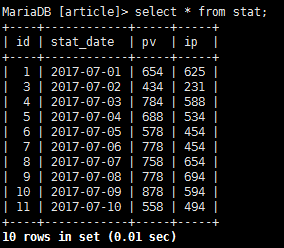
发布于:2018-7-16 18:32 作者:admin 浏览:31321. 查看数据
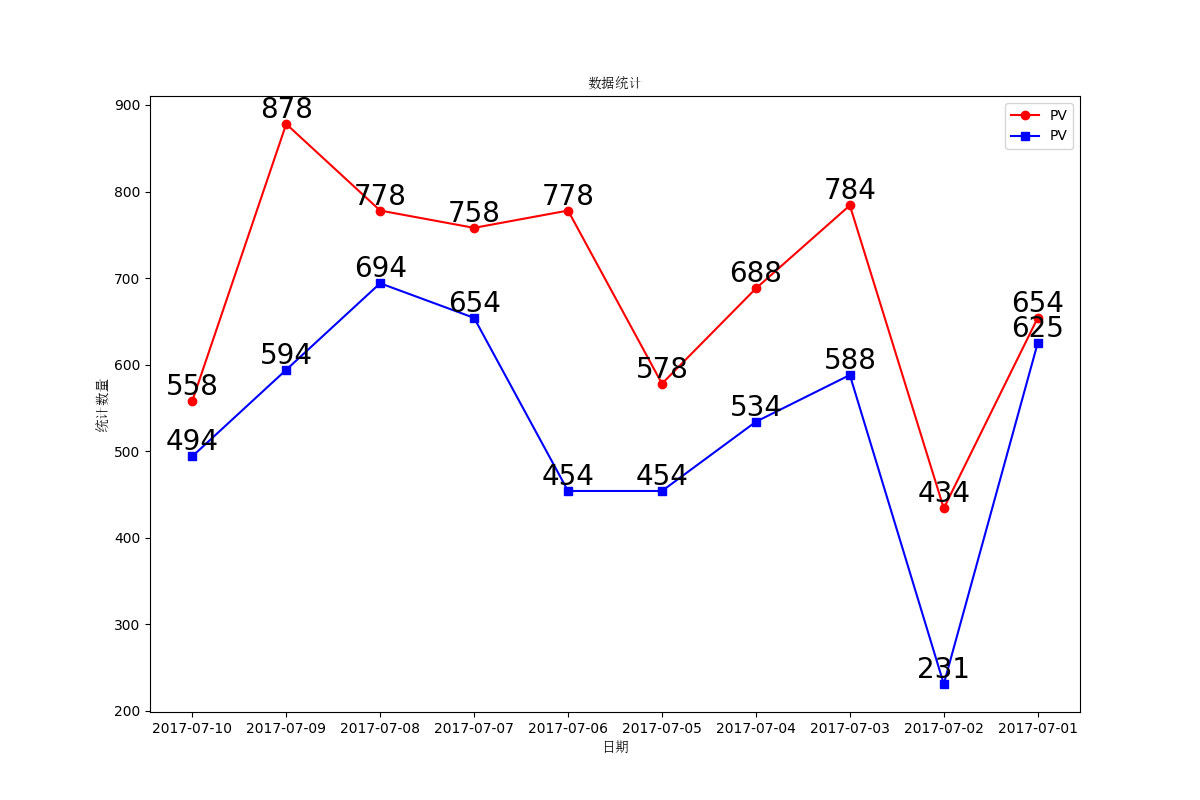
2. 图形代码
#!/usr/bin/python3
# -*- coding: utf-8 -*-


#引入库
import matplotlib
matplotlib.use('Agg')
import matplotlib.pyplot as plt
import pymysql
from matplotlib.font_manager import *

#定义自定义字体,文件名从1.b查看系统中文字体中来
myfont = FontProperties(fname='/usr/share/fonts/stix/simsun.ttc')
#解决负号'-'显示为方块的问题
matplotlib.rcParams['axes.unicode_minus']=False

#初始化变量
x=[]
y1=[]
y2=[]


# 打开数据库连接
db = pymysql.connect("localhost","root","","article" )

# 使用 cursor() 方法创建一个游标对象 cursor
cursor = db.cursor()

# SQL 查询语句
sql = "SELECT stat_date,pv,ip FROM stat ORDER BY id DESC LIMIT 0,10"
try:
	# 执行SQL语句
	cursor.execute(sql)

	# 获取所有记录列表
	results = cursor.fetchall()
	for row in results:
		x.append(row[0])
		y1.append(row[1])
		y2.append(row[2])

	# 打印结果
	#print(x)
	#print(y1)
	#print(y2)

except:
	print ("Error!")


# 关闭数据库连接
db.close()


#绘制图形
plt.figure(figsize=(12,8))
plt.plot(x,y1,label='PV',color='r',marker='o')
plt.plot(x,y2,label='PV',color='b',marker='s')
plt.xlabel(u'日期',fontproperties=myfont)
plt.ylabel(u'统计数量',fontproperties=myfont)
plt.title(u'数据统计',fontproperties=myfont)
plt.xticks(rotation=0)
# 设置数字标签
for a, b in zip(x, y1):
    plt.text(a, b, b, ha='center', va='bottom', fontsize=20)
for a, b in zip(x, y2):
    plt.text(a, b, b, ha='center', va='bottom', fontsize=20)
plt.legend()
#plt.show()
plt.savefig("stat.png")
3.显示图形
智能文章系统实战-统计数据展示(16)
发布于:2018-7-13 15:58 作者:admin 浏览:32421. 查看统计数据
2. 统计代码(PHP+JS)
<?php
header("Content-Type:text/html;charset=utf-8");
error_reporting(0);

//变量初始化
$title="数据统计";
$labelsArray=array();
$pvArray=array();
$ipArray=array();

//查询统计表数据
$mysqli = new mysqli('localhost', 'root', '', 'article');
if ($mysqli->connect_errno) {
    printf("数据库连接错误!");
    exit();
}

$sql="SELECT * FROM stat ORDER BY id DESC LIMIT 10";
$result = $mysqli->query($sql);
if($result)
{
	while($row = $result->fetch_array(MYSQLI_ASSOC))
	{
	  $labelsArray[]=$row['stat_date'];
	  $pvArray[]=$row['pv'];
	  $ipArray[]=$row['ip'];
	}
}
$mysqli->close();


//合成统计图形需要的数据
$labelsStr="";
$pvStr=0;
$ipStr=0;
if($labelsArray)
{
	$labelsStr="'".implode("','",array_reverse($labelsArray))."'";
}
if($pvArray)
{
	$pvStr=implode(",",array_reverse($pvArray));
}
if($ipArray)
{
	$ipStr=implode(",",array_reverse($ipArray));
}
?>
<!DOCTYPE html>
<html lang="zh-CN">
<head>
    <meta charset="UTF-8">
    <meta http-equiv="content-type" content="text/html; charset=utf-8">
    <meta http-equiv="X-UA-Compatible" content="IE=edge,chrome=1"/>
    <meta name="viewport" content="width=device-width, initial-scale=1.0, minimum-scale=1.0, maximum-scale=1.0, user-scalable=no">
    <script src="https://cdnjs.cloudflare.com/ajax/libs/Chart.js/2.7.2/Chart.bundle.js"></script>
	<title>数据统计</title>
</head>
<body>
<div>
<body>
	<div style="width:70%;" >
		<canvas id="canvas" style="text-align:center;"></canvas>
	</div>
	<br>
	<br>

	<script>

		var config = {
			type: 'line',
			data: {
				labels: [<?=$labelsStr?>],
				datasets: [{
					label: 'PV',
					backgroundColor: "#FF0000",
					borderColor: "#FF0000",
					data: [<?=$pvStr?>],
					fill: false,
				}, {
					label: 'IP',
					fill: false,
					backgroundColor: "#00FF00",
					borderColor: "#00FF00",
					data: [<?=$ipStr?>],
				}]
			},
			options: {
				responsive: true,
				title: {
					display: true,
					text: '数据统计'
				}
			}
		};

		window.onload = function() {
			var ctx = document.getElementById('canvas').getContext('2d');
			new Chart(ctx, config);
		};


	</script>
</body>
</html>
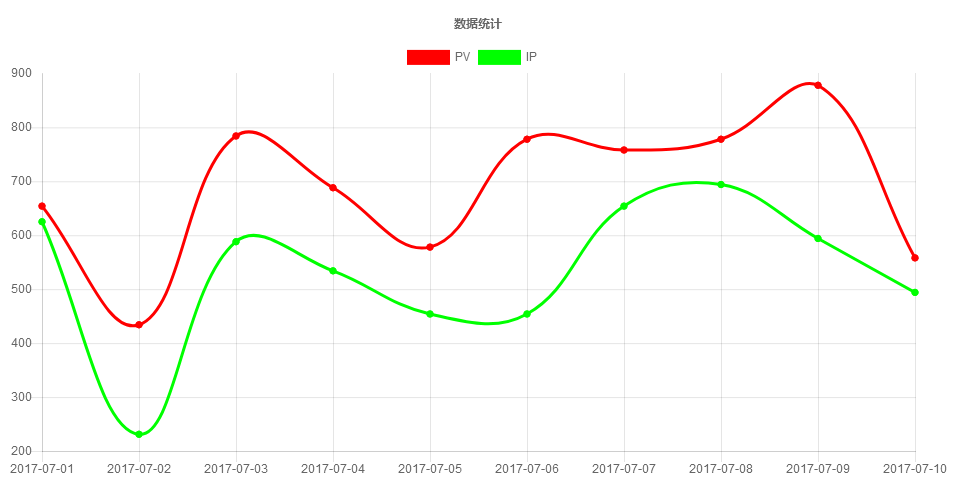
3.查看统计图
智能文章系统实战-Hive数据仓库(15)
发布于:2018-7-12 16:07 作者:admin 浏览:34981. hive 安装
http://www.wangfeilong.cn/server/118.html
2.查看上节用Hadoop清洗过的数据pvlog.txt[root@localhost hive]# cat /tmp/pvlog.txt 192.168.100.1 1530460833 http://news.demo.com/h5.php?action=show&id=89 192.168.100.1 1530460803 http://news.demo.com/h5.php?action=show&id=128
3启动HIVE并且创建数据库
[root@localhost hive]# hive
which: no hbase in (/usr/local/soft/hive/bin:/usr/local/soft/Hadoop/hadoop/bin:/usr/local/soft/Hadoop/hadoop/sbin:/usr/local/soft/jdk1.8.0_17/bin:/usr/local/sbin:/usr/local/bin:/usr/sbin:/usr/bin:/root/bin)
SLF4J: Class path contains multiple SLF4J bindings.
SLF4J: Found binding in [jar:file:/usr/local/soft/hive/lib/log4j-slf4j-impl-2.6.2.jar!/org/slf4j/impl/StaticLoggerBinder.class]
SLF4J: Found binding in [jar:file:/usr/local/soft/Hadoop/hadoop/share/hadoop/common/lib/slf4j-log4j12-1.7.25.jar!/org/slf4j/impl/StaticLoggerBinder.class]
SLF4J: See http://www.slf4j.org/codes.html#multiple_bindings for an explanation.
SLF4J: Actual binding is of type [org.apache.logging.slf4j.Log4jLoggerFactory]

Logging initialized using configuration in jar:file:/usr/local/soft/hive/lib/hive-common-2.3.3.jar!/hive-log4j2.properties Async: true
Hive-on-MR is deprecated in Hive 2 and may not be available in the future versions. Consider using a different execution engine (i.e. spark, tez) or using Hive 1.X releases.

hive> CREATE DATABASE IF NOT EXISTS article;
OK
Time taken: 7.758 seconds

hive> show databases;
OK
article
default
demo
wordcount
Time taken: 0.229 seconds, Fetched: 4 row(s)


hive> use article;
OK
Time taken: 0.068 seconds
4.hive详细日志表
4.1 创建明细表
hive> create table pvlog(
    > ip string,
    > times string,
    > url string)
    > PARTITIONED BY (stat_date string)
    > row format delimited fields terminated by '\t' stored as textfile;
OK
Time taken: 0.582 seconds
4.2 加载文本数据到HIVE数据库表
hive> load data local inpath '/tmp/pvlog.txt' overwrite into table pvlog partition(stat_date='2018-07-01');
Loading data to table article.pvlog partition (stat_date=2018-07-01)
OK
Time taken: 2.383 seconds
4.3 查询明细表数据
hive> select * from pvlog where stat_date = '2018-07-01';
OK
192.168.100.1	1530460833	http://news.demo.com/h5.php?action=show&id=89	2018-07-01
192.168.100.1	1530460803	http://news.demo.com/h5.php?action=show&id=128	2018-07-01
Time taken: 4.96 seconds, Fetched: 2 row(s)
5.统计数据
5.1 创建统计表
hive> create table stat(
    > stat_date string,
    > pv int,
    > ip int
    > )
    > row format delimited fields terminated by '\t' stored as textfile;
OK
Time taken: 0.26 seconds
5.2 统计数据
hive> insert into stat
    > select stat_date,count(*) as pv,count(distinct(ip)) as ip from pvlog where stat_date = '2018-07-01' group by stat_date;
WARNING: Hive-on-MR is deprecated in Hive 2 and may not be available in the future versions. Consider using a different execution engine (i.e. spark, tez) or using Hive 1.X releases.
Query ID = root_20180710175116_136d9e36-a8fc-4d0d-9f91-93dd71aba321
Total jobs = 1
Launching Job 1 out of 1
Number of reduce tasks not specified. Estimated from input data size: 1
In order to change the average load for a reducer (in bytes):
  set hive.exec.reducers.bytes.per.reducer=<number>
In order to limit the maximum number of reducers:
  set hive.exec.reducers.max=<number>
In order to set a constant number of reducers:
  set mapreduce.job.reduces=<number>
Starting Job = job_1531202649478_0010, Tracking URL = http://localhost:8088/proxy/application_1531202649478_0010/
Kill Command = /usr/local/soft/Hadoop/hadoop/bin/hadoop job  -kill job_1531202649478_0010
Hadoop job information for Stage-1: number of mappers: 1; number of reducers: 1
2018-07-10 17:51:36,560 Stage-1 map = 0%,  reduce = 0%
2018-07-10 17:51:52,289 Stage-1 map = 100%,  reduce = 0%, Cumulative CPU 2.23 sec
2018-07-10 17:52:07,262 Stage-1 map = 100%,  reduce = 100%, Cumulative CPU 5.86 sec
MapReduce Total cumulative CPU time: 5 seconds 860 msec
Ended Job = job_1531202649478_0010
Loading data to table article.stat
MapReduce Jobs Launched:
Stage-Stage-1: Map: 1  Reduce: 1   Cumulative CPU: 5.86 sec   HDFS Read: 9792 HDFS Write: 83 SUCCESS
Total MapReduce CPU Time Spent: 5 seconds 860 msec
OK
Time taken: 53.74 seconds
5.3 查询统计结果
hive> select * from stat;
OK
2018-07-01	2	1
Time taken: 0.36 seconds, Fetched: 1 row(s)
6.查看统计的数据文件
7.把统计导入MYSQL数据库
智能文章系统实战-Hadoop海量数据统计(14)
发布于:2018-7-10 17:15 作者:admin 浏览:29171.把hadoop添加到环境变量
#vi /etc/profile
export HADOOP_HOME=/usr/local/soft/Hadoop/hadoop
export PATH=${HADOOP_HOME}/bin:${HADOOP_HOME}/sbin:$PATH
export CLASSPATH=$($HADOOP_HOME/bin/hadoop classpath):$CLASSPATH

#source /etc/profile
2.启动hadoop
#hdfs namenode -format
#start-all.sh
#hadoop fs -mkdir -p HDFS_INPUT_PV_IP
3.查看案例日志
#cat /var/log/nginx/news.demo.com.access.log-20180701
192.168.100.1 - - [01/Jul/2018:15:59:48 +0800] "GET http://news.demo.com/h5.php HTTP/1.1" 200 3124 "-" "Mozilla/5.0 (Windows NT 6.1; WOW64) AppleWebKit/537.36 (KHTML, like Gecko) Chrome/63.0.3239.132 Safari/537.36" "-"
192.168.100.1 - - [01/Jul/2018:16:00:03 +0800] "GET http://news.demo.com/h5.php?action=show&id=128 HTTP/1.1" 200 1443 "http://news.demo.com/h5.php" "Mozilla/5.0 (Windows NT 6.1; WOW64) AppleWebKit/537.36 (KHTML, like Gecko) Chrome/63.0.3239.132 Safari/537.36" "-"
192.168.100.1 - - [01/Jul/2018:16:00:22 +0800] "GET http://news.demo.com/h5.php HTTP/1.1" 200 3124 "-" "Mozilla/5.0 (Windows NT 6.1; WOW64) AppleWebKit/537.36 (KHTML, like Gecko) Chrome/63.0.3239.132 Safari/537.36" "-"
192.168.100.1 - - [01/Jul/2018:16:00:33 +0800] "GET http://news.demo.com/h5.php?action=show&id=89 HTTP/1.1" 200 6235 "http://news.demo.com/h5.php" "Mozilla/5.0 (Windows NT 6.1; WOW64) AppleWebKit/537.36 (KHTML, like Gecko) Chrome/63.0.3239.132 Safari/537.36" "-"
4. 采集日志数据 (sh 脚本,hadoop 脚本,实际使用 配置计划任务每天00:01分处理昨天的日志)
#vi hadoopLog.sh

#!/bin/sh
#昨天的日期
yesterday=$(date --date='1 days ago' +%Y%m%d)
#测试案例日志日期
yesterday="20180701"
#hadoop命令行上传文件
hadoop fs -put /var/log/news.demo.com.access.log-${yesterday} HDFS_INPUT_PV_IP/${yesterday}.log


#sh hadoopLog.sh
5. Hadoop处理日志数据PHP之MAP
#vi /usr/local/soft/Hadoop/hadoop/demo/StatMap.php
<?php
error_reporting(0);
while (($line = fgets(STDIN)) !== false)
{
   if(stripos($line,'action=show')>0)
   {

		$words = preg_split('/(\s+)/', $line);
		echo $words[0].chr(9).strtotime(str_replace('/',' ',substr($words[3],1,11))." ".substr($words[3],13)).chr(9).$words[6].PHP_EOL;
   }
}
?>
6. Hadoop处理日志数据PHP之Reduce
#vi /usr/local/soft/Hadoop/hadoop/demo/StatReduce.php
<?php
error_reporting(0);
$fp=fopen('/tmp/pvlog.txt','w+');

$pvNum=0;
$ipNum=0;
$ipList=array();
while (($line = fgets(STDIN)) !== false)
{
	$pvNum=$pvNum+1;
	$tempArray=explode(chr(9),$line);
    $ip = trim($tempArray[0]);
	if(!in_array($ip,$ipList))
	{
		$ipList[]=$ip;
		$ipNum=$ipNum+1;
	}

	//把每行的详细数据记录文件中,用户HIVE统计和HBASE详细记录
	fwrite($fp,$line);
}

fclose($fp);


//把统计的插入MYSQL数据库
$yestoday=date("Y-m-d",time()-86400); //实际统计昨天的数据
$yestoday='2018-07-01'; //以2018-07-01的日志进行测试
$mysqli = new mysqli('localhost', 'root', '', 'article');
$sql="INSERT INTO stat SET stat_date='{$yestoday}',pv={$pvNum},ip={$ipNum}";
$mysqli->query($sql);
$mysqli->close();


echo "DATE=".$yestoday.PHP_EOL;
echo "PV=".$pvNum.PHP_EOL;
echo "IP=".$ipNum.PHP_EOL;


?>
7. Hadoop处理日志数据(流方式)
#hadoop jar /usr/local/soft/Hadoop/hadoop/share/hadoop/tools/lib/hadoop-streaming-2.9.1.jar -mapper /usr/local/soft/Hadoop/hadoop/demo/StatMap.php -reducer /usr/local/soft/Hadoop/hadoop/demo/StatReduce.php -input HDFS_INPUT_PV_IP/* -output HDFS_OUTPUT_PV_IP8.查看统计结果
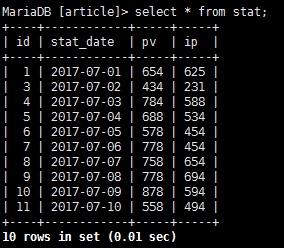
9.查看数据库的统计结果
10.查看/tmp/pvlog.txt的清洗结果
11.重复运行处理数据,需要删除已经存在的输出目录
#hadoop fs -rm -r -f HDFS_OUTPUT_PV_IP
12.案例命令集合
#hadoop fs -mkidr -p HDFS_INPUT_PV_IP
#hadoop fs -put /var/log/nginx/news.demo.com.access.log-20180701 HDFS_INPUT_PV_IP
#hadoop jar /usr/local/soft/Hadoop/hadoop/share/hadoop/tools/lib/hadoop-streaming-2.9.1.jar  -mapper /usr/local/soft/Hadoop/hadoop/demo/StatMap.php -reducer /usr/local/soft/Hadoop/hadoop/demo/StatReduce.php  -input HDFS_INPUT_PV_IP/* -output HDFS_OUTPUT_PV_IP
#hadoop fs -cat HDFS_OUTPUT_PV_IP/*
MariaDB [article]> select * from stat;
智能文章系统实战-数据统计(13)
发布于:2018-7-1 16:53 作者:admin 浏览:32611. 数据文件
#cat /var/log/nginx/news.demo.com.access.log-20180701
192.168.100.1 - - [01/Jul/2018:15:59:48 +0800] "GET http://news.demo.com/h5.php HTTP/1.1" 200 3124 "-" "Mozilla/5.0 (Windows NT 6.1; WOW64) AppleWebKit/537.36 (KHTML, like Gecko) Chrome/63.0.3239.132 Safari/537.36" "-"
192.168.100.1 - - [01/Jul/2018:16:00:03 +0800] "GET http://news.demo.com/h5.php?action=show&id=128 HTTP/1.1" 200 1443 "http://news.demo.com/h5.php" "Mozilla/5.0 (Windows NT 6.1; WOW64) AppleWebKit/537.36 (KHTML, like Gecko) Chrome/63.0.3239.132 Safari/537.36" "-"
192.168.100.1 - - [01/Jul/2018:16:00:22 +0800] "GET http://news.demo.com/h5.php HTTP/1.1" 200 3124 "-" "Mozilla/5.0 (Windows NT 6.1; WOW64) AppleWebKit/537.36 (KHTML, like Gecko) Chrome/63.0.3239.132 Safari/537.36" "-"
192.168.100.1 - - [01/Jul/2018:16:00:33 +0800] "GET http://news.demo.com/h5.php?action=show&id=89 HTTP/1.1" 200 6235 "http://news.demo.com/h5.php" "Mozilla/5.0 (Windows NT 6.1; WOW64) AppleWebKit/537.36 (KHTML, like Gecko) Chrome/63.0.3239.132 Safari/537.36" "-"
2. 数据表结构
CREATE TABLE IF NOT EXISTS `stat` (
  `id` int(11) NOT NULL AUTO_INCREMENT,
  `stat_date` varchar(30) NOT NULL DEFAULT '' COMMENT '统计日期',
  `pv` int(11) NOT NULL DEFAULT '0' COMMENT 'PV量',
  `ip` int(11) NOT NULL DEFAULT '0' COMMENT 'IP量',
  PRIMARY KEY (`id`),
  UNIQUE KEY `stat_date` (`stat_date`)
) ENGINE=InnoDB DEFAULT CHARSET=utf8 COMMENT='文章阅读统计' AUTO_INCREMENT=1 ;
3. 统计代码
<?php
header("Content-Type:text/html;charset=utf-8");
error_reporting(E_ALL & ~E_NOTICE);
date_default_timezone_set('PRC');


$pv=0;
$ip=0;
$ipList=array();

$yestoday=date("Y-m-d",time()-86400); //实际读取昨天的日志
$yestoday='2018-07-01'; //读取2018-07-01的日志,用来测试
$fileName=date('Ymd',strtotime($yestoday));
//读取日志文件
$logPath="/var/log/nginx/news.demo.com.access.log-{$fileName}";
if(file_exists($logPath))
{
	$fileContents=file_get_contents($logPath);
	$fileArray=explode("\n",$fileContents);
	foreach($fileArray as $str)
	{
		//过滤只有阅读文章内容的数据
		if(strpos($str,'action=show'))
		{

			$tempArray=explode(" ",$str);

			//统计PV
			$pv=$pv+1;

			//统计IP
			$userip=$tempArray[0];
			if(!in_array($userip,$ipList))
			{
				$ipList[]=$userip;
				$ip=$ip+1;
			}
		}
	}
}


//插入MYSQL数据库
$mysqli = new mysqli('localhost', 'root', '', 'article');
$sql="INSERT INTO stat SET stat_date='{$yestoday}',pv={$pv},ip={$ip}";
$mysqli->query($sql);
$mysqli->close();


?>
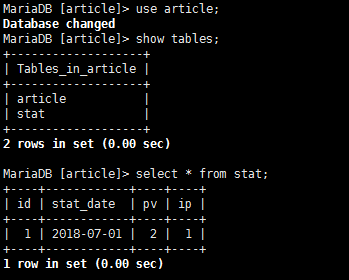
4. 统计结果
//统计结果
MariaDB [article]> select * from stat;
+----+------------+----+----+
| id | stat_date  | pv | ip |
+----+------------+----+----+
|  1 | 2018-07-01 |  2 |  1 |
+----+------------+----+----+
1 row in set (0.00 sec)
智能文章系统实战-人工智能机器学习之内容推荐(12)
发布于:2018-7-1 10:49 作者:admin 浏览:27631. 安装环境
#pip3 install pymysql
#pip3 install jieba
#pip3 install numpy
#pip3 install scipy
#pip3 install sklearn
#pip3 install pandas
2.内容推荐代码代码
#!/usr/bin/env python
#-*- coding:utf-8 -*-


#安装环境
#pip3 install pymysql
#pip3 install jieba
#pip3 install numpy
#pip3 install scipy
#pip3 install sklearn
#pip3 install pandas


#引入库
import pandas as pd #分词
import pymysql.cursors  #数据库
import re #正则过滤
import jieba #分词
from sklearn.feature_extraction.text import TfidfVectorizer  #结构化表示--向量空间模型
from sklearn.metrics.pairwise import linear_kernel


#初始化内容和分类的列表
dataList=[]


#定义函数,HTML转化为分词后用空格分离的字符串
def htmlToWords(html):
	reObject = re.compile(r'<[^>]+>',re.S)
	#过滤HTML
	text = reObject.sub('',html)
	#过滤\r\n
	text = re.sub('\t|\n|\r','',text)
	#分词
	words=jieba.cut(text)
	#把分词数组组成字符串返回
	return " ".join(words)


# 连接MySQL数据库
connection = pymysql.connect(host='localhost', port=3306, user='root', password='', db='article', charset='utf8', cursorclass=pymysql.cursors.DictCursor)

# 通过cursor创建游标
cursor = connection.cursor()

# 执行数据查询
sql = "SELECT `id`, `title`,`content` FROM `article` order by id desc limit 200"
cursor.execute(sql)

#查询数据库多条数据
result = cursor.fetchall()
for data in result:

	#HTML转化为分词后用空格分离的字符串赋值给words,此处以 标题title 进行相似度计算,也可以 文章内容content 进行相似度计算.
	item={'id':data['id'],'words':htmlToWords(data['title'])}
	dataList.append(item)


#创建数据集
ds = pd.DataFrame(dataList)

#将文本数据转化成特征向量
tf = TfidfVectorizer(analyzer='word', min_df=0, stop_words='english')
tfidf_matrix = tf.fit_transform(ds['words'])

#人工智能进行相似度计算
cosine_similarities = linear_kernel(tfidf_matrix, tfidf_matrix)
#print(cosine_similarities)


#相似结果列表
resultList={}

#每篇文章和其他文章的相似度
for idx, row in ds.iterrows():

	#排序倒序,取前 5 篇文章相似的
	similar_indices = cosine_similarities[idx].argsort()[:-6:-1]

	#输出每篇文章相似的文章ID和文章相似度
	similar_items = [(cosine_similarities[idx][i], ds['id'][i]) for i in similar_indices]

	#用字典存储每篇文章ID对应的相似度结果
	resultList[row['id']]=similar_items

#输出每篇文章ID对应的相似度结果
#print(resultList)


#数据和文章ID=14 标题相似的 文章标题
resultDs=resultList[14]
print("标题相似的结果: ",resultDs)
for row in resultDs:

	#输出相似度>0的文章
	if row[0]>0:
		# 执行数据查询
		sql = "SELECT `id`, `title` FROM `article` WHERE id='%d' LIMIT 1"%(row[1])
		cursor.execute(sql)
		data = cursor.fetchone()

		#打印结果
		print(data)
		print("相似度=",row[0])

# 关闭数据连接
connection.close()
3. 结果输出
[root@bogon python]# python3 recommend.py
Building prefix dict from the default dictionary ...
Loading model from cache /tmp/jieba.cache
Loading model cost 1.564 seconds.
Prefix dict has been built succesfully.
标题相似的结果:  [(1.0, 14), (0.23201380925542303, 67), (0.215961061528388, 11), (0.09344442103258274, 29), (0.0, 1)]
{'id': 14, 'title': '个税大利好!起征点调至每年6万 增加专项扣除'}
相似度= 1.0
{'id': 67, 'title': '个税起征点拟上调至每年6万 第7次修正百姓获益几何?'}
相似度= 0.23201380925542303
{'id': 11, 'title': '个税起征点提高利好买房?月供1万个税可降2000多元'}
相似度= 0.215961061528388
{'id': 29, 'title': '个税起征点拟提至每月5000元 月薪万元能省多少?'}
相似度= 0.09344442103258274
[root@bogon python]#
智能文章系统实战-人工智能机器学习预测文章分类(11)
发布于:2018-7-1 10:33 作者:admin 浏览:31641.安装环境
#pip3 install pymysql
#pip3 install jieba
#pip3 install numpy
#pip3 install scipy
#pip3 install sklearn
2.机器学习预测分类
#!/usr/bin/env python
#-*- coding:utf-8 -*-

#安装环境
#pip3 install pymysql
#pip3 install jieba
#pip3 install numpy
#pip3 install scipy
#pip3 install sklearn


#引入库
import pymysql.cursors  #数据库
import re #正则过滤
import jieba #分词
from sklearn.feature_extraction.text import CountVectorizer  #结构化表示--向量空间模型
from sklearn.model_selection import train_test_split #把数据分成训练集和测试集
from sklearn.naive_bayes import MultinomialNB #朴素贝叶斯分类器


#建立对象
vecObject = CountVectorizer(analyzer='word', max_features=4000,  lowercase = False)
classifierObject = MultinomialNB()

#初始化内容和分类的列表
contentList=[]
categoryList=[]


#定义函数,HTML转化为分词后用空格分离的字符串
def htmlToWords(html):
	reObject = re.compile(r'<[^>]+>',re.S)
	#过滤HTML
	text = reObject.sub('',html)
	#过滤\r\n
	text = re.sub('\t|\n|\r','',text)
	#分词
	words=jieba.cut(text)
	#把分词数组组成字符串返回
	return " ".join(words)


# 连接MySQL数据库
connection = pymysql.connect(host='localhost', port=3306, user='root', password='', db='article', charset='utf8', cursorclass=pymysql.cursors.DictCursor)

# 通过cursor创建游标
cursor = connection.cursor()

# 执行数据查询
sql = "SELECT `id`, `title`,`content`,`category` FROM `article` order by id desc limit 100"
cursor.execute(sql)

#查询数据库多条数据
result = cursor.fetchall()
for data in result:

	#HTML转化为分词后用空格分离的字符串
	wordsStr=htmlToWords(data['content'])

	#添加内容
	contentList.append(wordsStr)
	categoryList.append(data['category'])


# 关闭数据连接
connection.close()

#把数据分成训练集和测试集
x_train, x_test, y_train, y_test = train_test_split(contentList, categoryList, random_state=1)


#结构化表示--向量空间模型
vecObject.fit(x_train)

#人工智能训练数据
classifierObject.fit(vecObject.transform(x_train), y_train)

#测试 测试集,准确度
score=classifierObject.score(vecObject.transform(x_test), y_test)
print("准确度score=",score,"\n")


#新数据预测分类

#预测分类案例1
predictHTML='<p>人民币对美元中间价为6.5569,创2017年12月25日以来最弱水平。人民币贬值成为市场讨论的热点,在美元短暂升值下,新兴市场货币贬值问题也备受关注。然而,从货币本身的升值与贬值来看,货币贬值的收益率与促进性是正常的,反而货币升值的破坏与打击则是明显的。当前人民币贬值正在进行中,市场预期破7的舆论喧嚣而起。尽管笔者也预计过年内破7的概率存在,但此时伴随中国股市下跌局面,我们应该审慎面对这一问题。</p>' #新的文章内容HTML
predictWords=htmlToWords(predictHTML)
predictCategory=classifierObject.predict(vecObject.transform([predictWords]))
print("案例1分词后文本=",predictWords,"\n")
print("案例1预测文本类别=","".join(predictCategory),"\n\n\n")


#预测分类案例2
predictHTML='<p>25日在报道称,央视罕见播放了多枚“东风-10A”巡航导弹同时命中一栋大楼的画面,坚固的钢筋混凝土建筑在导弹的打击下,瞬间灰飞烟灭。这种一栋大楼瞬间被毁的恐怖画面,很可能是在预演一种教科书式的斩首行动,表明解放军具备了超远距离的精准打击能力</p>' #新的文章内容HTML
predictWords=htmlToWords(predictHTML)
predictCategory=classifierObject.predict(vecObject.transform([predictWords]))
print("案例2分词后文本=",predictWords,"\n")
print("案例2预测文本类别=","".join(predictCategory),"\n")
3.输出结果
[root@bogon python]# python3 predictCategory.py
Building prefix dict from the default dictionary ...
Loading model from cache /tmp/jieba.cache
Loading model cost 1.588 seconds.
Prefix dict has been built succesfully.
准确度score= 0.8571428571428571

案例1分词后文本= 人民币 对 美元 中间价 为 6.5569 , 创 2017 年 12 月 25 日 以来 最 弱 水平 。 人民币 贬值 成为 市场 讨论 的 热点 , 在 美元 短暂 升值 下 , 新兴 市场 货币贬值 问题 也 备受 关注 。 然而 , 从 货币 本身 的 升值 与 贬值 来看 , 货币贬值 的 收益率 与 促进性 是 正常 的 , 反而 货币 升值 的 破坏 与 打击 则 是 明显 的 。 当前 人民币 贬值 正在 进行 中 , 市场 预期 破 7 的 舆论 喧嚣 而 起 。 尽管 笔者 也 预计 过年 内破 7 的 概率 存在 , 但 此时 伴随 中国 股市 下跌 局面 , 我们 应该 审慎 面对 这一 问题 。

案例1预测文本类别= 金融


案例2分词后文本= 25 日 在 报道 称 , 央视 罕见 播放 了 多枚 “ 东风 - 10A ” 巡航导弹 同时 命中 一栋 大楼 的 画面 , 坚固 的 钢筋 混凝土 建筑 在 导弹 的 打击 下 , 瞬间 灰飞烟灭 。 这种 一栋 大楼 瞬间 被 毁 的 恐怖 画面 , 很 可能 是 在 预演 一种 教科书 式 的 斩首 行动 , 表明 解放军 具备 了 超 远距离 的 精准 打击 能力

案例2预测文本类别= 军事

[root@bogon python]#
