Android数据库SQLite的使用示例
发布于:2014-7-22 9:55 作者:admin 浏览:2765 分类:Android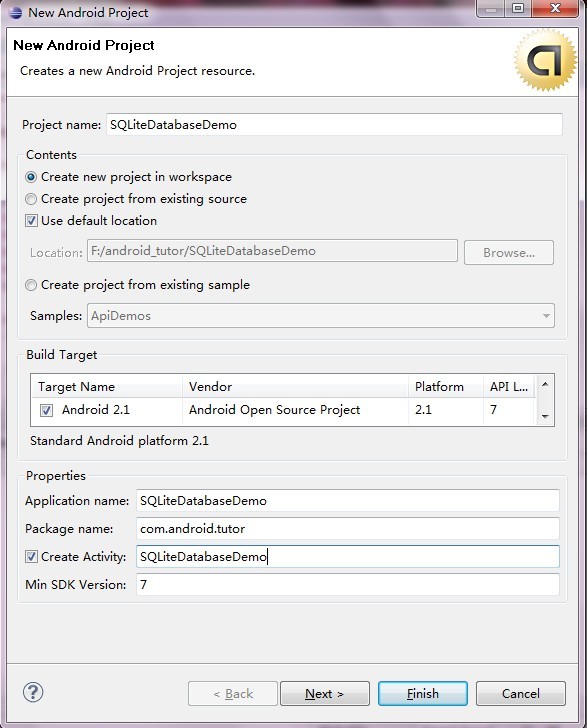
package com.android.tutor;
import android.content.ContentValues;
import android.content.Context;
import android.database.Cursor;
import android.database.sqlite.SQLiteDatabase;
import android.database.sqlite.SQLiteOpenHelper;
public class BooksDB extends SQLiteOpenHelper {
private final static String DATABASE_NAME = "BOOKS.db";
private final static int DATABASE_VERSION = 1;
private final static String TABLE_NAME = "books_table";
public final static String BOOK_ID = "book_id";
public final static String BOOK_NAME = "book_name";
public final static String BOOK_AUTHOR = "book_author";

public BooksDB(Context context) {
// TODO Auto-generated constructor stub
super(context, DATABASE_NAME, null, DATABASE_VERSION);
}
//创建table
@Override
public void onCreate(SQLiteDatabase db) {
String sql = "CREATE TABLE " + TABLE_NAME + " (" + BOOK_ID
+ " INTEGER primary key autoincrement, " + BOOK_NAME + " text, "+ BOOK_AUTHOR +" text);";
db.execSQL(sql);
}
@Override
public void onUpgrade(SQLiteDatabase db, int oldVersion, int newVersion) {
String sql = "DROP TABLE IF EXISTS " + TABLE_NAME;
db.execSQL(sql);
onCreate(db);
}

public Cursor select() {
SQLiteDatabase db = this.getReadableDatabase();
Cursor cursor = db
.query(TABLE_NAME, null, null, null, null, null, null);
return cursor;
}
//增加操作
public long insert(String bookname,String author)
{
SQLiteDatabase db = this.getWritableDatabase();
/* ContentValues */
ContentValues cv = new ContentValues();
cv.put(BOOK_NAME, bookname);
cv.put(BOOK_AUTHOR, author);
long row = db.insert(TABLE_NAME, null, cv);
return row;
}
//删除操作
public void delete(int id)
{
SQLiteDatabase db = this.getWritableDatabase();
String where = BOOK_ID + " = ?";
String[] whereValue ={ Integer.toString(id) };
db.delete(TABLE_NAME, where, whereValue);
}
//修改操作
public void update(int id, String bookname,String author)
{
SQLiteDatabase db = this.getWritableDatabase();
String where = BOOK_ID + " = ?";
String[] whereValue = { Integer.toString(id) };

ContentValues cv = new ContentValues();
cv.put(BOOK_NAME, bookname);
cv.put(BOOK_AUTHOR, author);
db.update(TABLE_NAME, cv, where, whereValue);
}
}
第三步:修改main.xml布局如下,由两个EditText和一个ListView组成,代码如下:
<?xml version="1.0" encoding="utf-8"?>
<LinearLayout xmlns:android="http://schemas.android.com/apk/res/android"

android:orientation="vertical"
android:layout_width="fill_parent"
android:layout_height="fill_parent"
>
<EditText
android:id="@+id/bookname"
android:layout_width="fill_parent"
android:layout_height="wrap_content"

>
</EditText>
<EditText
android:id="@+id/author"
android:layout_width="fill_parent"
android:layout_height="wrap_content"
>
</EditText>
<ListView
android:id="@+id/bookslist"

android:layout_width="fill_parent"
android:layout_height="wrap_content"
>
</ListView>
</LinearLayout>
第四步:修改SQLiteDatabaseDemo.java代码如下:
package com.android.tutor;
import android.app.Activity;
import android.content.Context;
import android.database.Cursor;
import android.os.Bundle;
import android.view.Menu;
import android.view.MenuItem;
import android.view.View;
import android.view.ViewGroup;
import android.widget.AdapterView;
import android.widget.BaseAdapter;
import android.widget.EditText;
import android.widget.ListView;
import android.widget.TextView;
import android.widget.Toast;
public class SQLiteDatabaseDemo extends Activity implements AdapterView.OnItemClickListener {
private BooksDB mBooksDB;
private Cursor mCursor;
private EditText BookName;
private EditText BookAuthor;
private ListView BooksList;

private int BOOK_ID = 0;
protected final static int MENU_ADD = Menu.FIRST;
protected final static int MENU_DELETE = Menu.FIRST + 1;
protected final static int MENU_UPDATE = Menu.FIRST + 2;

public void onCreate(Bundle savedInstanceState) {
super.onCreate(savedInstanceState);
setContentView(R.layout.main);
setUpViews();
}

public void setUpViews(){
mBooksDB = new BooksDB(this);
mCursor = mBooksDB.select();

BookName = (EditText)findViewById(R.id.bookname);
BookAuthor = (EditText)findViewById(R.id.author);
BooksList = (ListView)findViewById(R.id.bookslist);

BooksList.setAdapter(new BooksListAdapter(this, mCursor));
BooksList.setOnItemClickListener(this);
}

@Override
public boolean onCreateOptionsMenu(Menu menu) {
super.onCreateOptionsMenu(menu);

menu.add(Menu.NONE, MENU_ADD, 0, "ADD");
menu.add(Menu.NONE, MENU_DELETE, 0, "DELETE");
menu.add(Menu.NONE, MENU_DELETE, 0, "UPDATE");
return true;
}

public boolean onOptionsItemSelected(MenuItem item)
{
super.onOptionsItemSelected(item);
switch (item.getItemId())
{
case MENU_ADD:
add();
break;
case MENU_DELETE:
delete();
break;
case MENU_UPDATE:
update();
break;
}
return true;
}

public void add(){
String bookname = BookName.getText().toString();
String author = BookAuthor.getText().toString();
//书名和作者都不能为空,或者退出
if (bookname.equals("") || author.equals("")){
return;
}
mBooksDB.insert(bookname, author);
mCursor.requery();
BooksList.invalidateViews();
BookName.setText("");
BookAuthor.setText("");
Toast.makeText(this, "Add Successed!", Toast.LENGTH_SHORT).show();
}

public void delete(){
if (BOOK_ID == 0) {
return;
}
mBooksDB.delete(BOOK_ID);
mCursor.requery();
BooksList.invalidateViews();
BookName.setText("");
BookAuthor.setText("");
Toast.makeText(this, "Delete Successed!", Toast.LENGTH_SHORT).show();
}

public void update(){
String bookname = BookName.getText().toString();
String author = BookAuthor.getText().toString();
//书名和作者都不能为空,或者退出
if (bookname.equals("") || author.equals("")){
return;
}
mBooksDB.update(BOOK_ID, bookname, author);
mCursor.requery();
BooksList.invalidateViews();
BookName.setText("");
BookAuthor.setText("");
Toast.makeText(this, "Update Successed!", Toast.LENGTH_SHORT).show();
}

@Override
public void onItemClick(AdapterView<?> parent, View view, int position, long id) {

mCursor.moveToPosition(position);
BOOK_ID = mCursor.getInt(0);
BookName.setText(mCursor.getString(1));
BookAuthor.setText(mCursor.getString(2));

}

public class BooksListAdapter extends BaseAdapter{
private Context mContext;
private Cursor mCursor;
public BooksListAdapter(Context context,Cursor cursor) {

mContext = context;
mCursor = cursor;
}
@Override
public int getCount() {
return mCursor.getCount();
}
@Override
public Object getItem(int position) {
return null;
}
@Override
public long getItemId(int position) {
return 0;
}
@Override
public View getView(int position, View convertView, ViewGroup parent) {
TextView mTextView = new TextView(mContext);
mCursor.moveToPosition(position);
mTextView.setText(mCursor.getString(1) + "___" + mCursor.getString(2));
return mTextView;
}

}
}
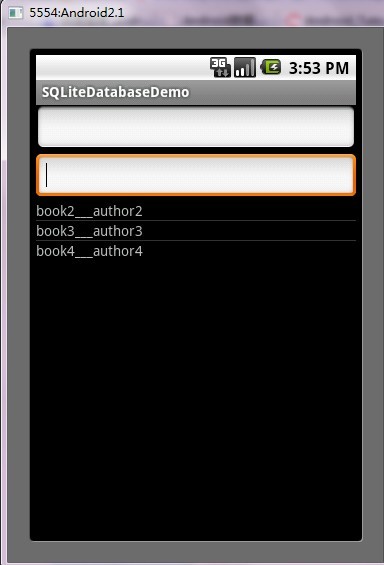
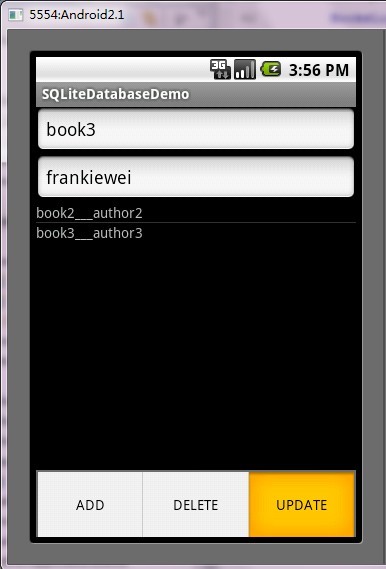
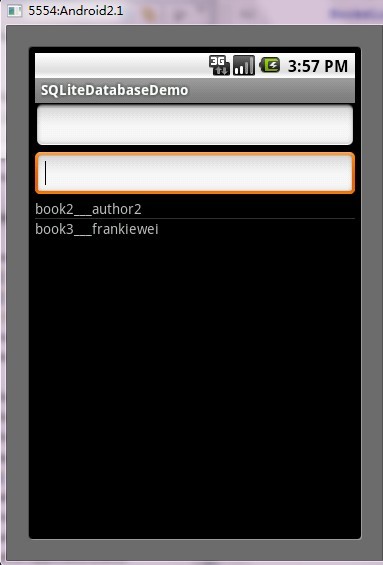
第五步:运行程序效果如下:
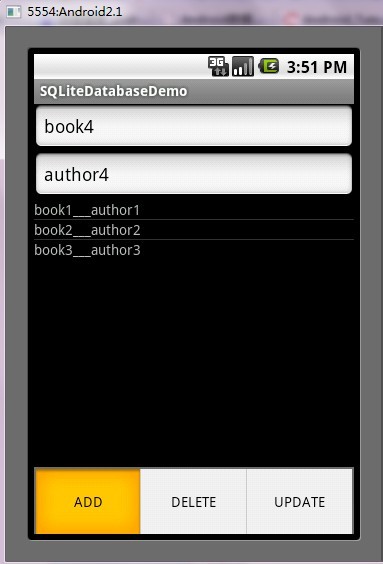
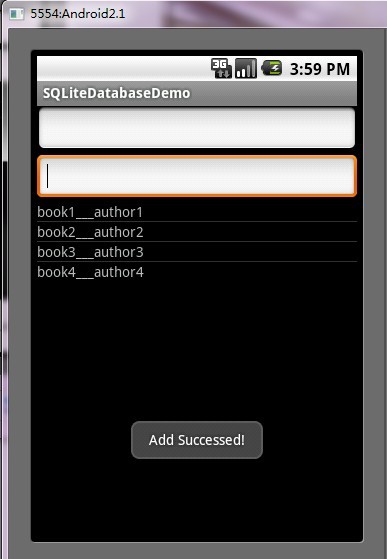
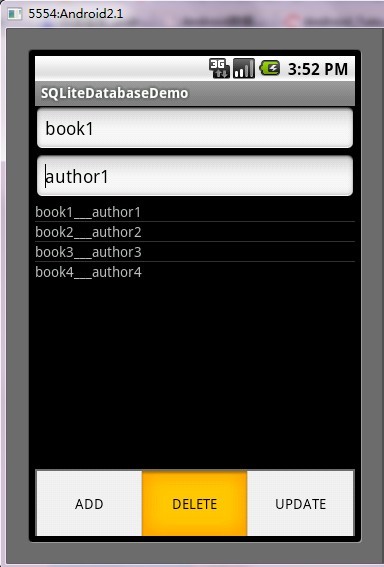
ANDROID开发之SQLite详解
发布于:2014-7-22 9:47 作者:admin 浏览:2194 分类:AndroidSQLite简介
Google为Andriod的较大的数据处理提供了SQLite,他在数据存储、管理、维护等各方面都相当出色,功能也非常的强大。SQLite具备下列特点:
1.轻量级
使用 SQLite 只需要带一个动态库,就可以享受它的全部功能,而且那个动态库的尺寸想当小。
2.独立性
SQLite 数据库的核心引擎不需要依赖第三方软件,也不需要所谓的“安装”。
3.隔离性
SQLite 数据库中所有的信息(比如表、视图、触发器等)都包含在一个文件夹内,方便管理和维护。
4.跨平台
SQLite 目前支持大部分操作系统,不至电脑操作系统更在众多的手机系统也是能够运行,比如:Android。
5.多语言接口
SQLite 数据库支持多语言编程接口。
6.安全性
SQLite 数据库通过数据库级上的独占性和共享锁来实现独立事务处理。这意味着多个进程可以在同一时间从同一数据库读取数据,但只能有一个可以写入数据。
Android中的SQLite使用
首先创建数据库类
|
public class DatabaseHelperextends SQLiteOpenHelper {
private static final String DB_NAME ="mydata.db";//数据库名称
private static final int version =1;//数据库版本
public DatabaseHelper(Context context) {
super(context, DB_NAME,null, version);
// TODO Auto-generated constructor stub
}
@Override
public void onCreate(SQLiteDatabase db) {
String sql ="create table user(username varchar(20) not null , password varchar(60) not null );";
db.execSQL(sql);
}
@Override
public void onUpgrade(SQLiteDatabase db,int oldVersion,int newVersion) {
// TODO Auto-generated method stub
}
}
|
SQLiteOpenHelper类介绍
SQLiteOpenHelper是SQLiteDatabase的一个帮助类,用来管理数据库的创建和版本的更新。一般是建立一个类继承它,并实现它的onCreate和onUpgrade方法。
| 方法名 | 方法描述 |
|---|---|
| SQLiteOpenHelper(Context context,String name,SQLiteDatabase.CursorFactory factory,int version) | 构造方法,一般是传递一个要创建的数据库名称那么参数 |
| onCreate(SQLiteDatabase db) | 创建数据库时调用 |
| onUpgrade(SQLiteDatabase db,int oldVersion , int newVersion) | 版本更新时调用 |
| getReadableDatabase() | 创建或打开一个只读数据库 |
| getWritableDatabase() | 创建或打开一个读写数据库 |
下面来介绍调用的方法
创建数据库
这里特别的地方是通过调用了SQLiteOpenHelper类的getReadableDatabase()方法来实现创建一个数据库的
|
1
2
3
|
DatabaseHelper database =new DatabaseHelper(this);//这段代码放到Activity类中才用this
SQLiteDatabase db =null;
db = database.getReadalbeDatabase();
|
SQLiteDatabase类为我们提供了很多种方法,而较常用的方法如下
| (返回值)方法名 | 方法描述 |
|---|---|
| (int) delete(String table,String whereClause,String[] whereArgs) | 删除数据行的便捷方法 |
| (long) insert(String table,String nullColumnHack,ContentValues values) | 添加数据行的便捷方法 |
| (int) update(String table, ContentValues values, String whereClause, String[] whereArgs) | 更新数据行的便捷方法 |
| (void) execSQL(String sql) | 执行一个SQL语句,可以是一个select或其他的sql语句 |
| (void) close() | 关闭数据库 |
| (Cursor) query(String table, String[] columns, String selection, String[] selectionArgs, String groupBy, String having, String orderBy, String limit) | 查询指定的数据表返回一个带游标的数据集 |
| (Cursor) rawQuery(String sql, String[] selectionArgs) | 运行一个预置的SQL语句,返回带游标的数据集(与上面的语句最大的区别就是防止SQL注入) |
数据的添删改查分别可以通过2种途径来实现
数据的添加
1.使用insert方法
|
1
2
3
|
ContentValues cv =new ContentValues();//实例化一个ContentValues用来装载待插入的数据cv.put("username","Jack Johnson");//添加用户名
cv.put("password","iLovePopMusic");//添加密码
db.insert("user",null,cv);//执行插入操作
|
2.使用execSQL方式来实现
|
1
2
|
String sql = "insert into user(username,password) values ('Jack Johnson','iLovePopMuisc');//插入操作的SQL语句
db.execSQL(sql);//执行SQL语句
|
数据的删除
同样有2种方式可以实现
|
1
2
3
|
String whereClause ="username=?";//删除的条件
String[] whereArgs = {"Jack Johnson"};//删除的条件参数
db.delete("user",whereClause,whereArgs);//执行删除
|
使用execSQL方式的实现
|
1
2
|
String sql ="delete from user where username='Jack Johnson'";//删除操作的SQL语句
db.execSQL(sql);//执行删除操作
|
数据修改
同上,仍是2种方式
|
1
2
3
4
5
|
ContentValues cv =new ContentValues();//实例化ContentValues
cv.put("password","iHatePopMusic");//添加要更改的字段及内容
String whereClause ="username=?";//修改条件
String[] whereArgs = {"Jack Johnson"};//修改条件的参数
db.update("user",cv,whereClause,whereArgs);//执行修改
|
使用execSQL方式的实现
|
1
2
|
String sql ="update [user] set password = 'iHatePopMusic' where username='Jack Johnson'";//修改的SQL语句
db.execSQL(sql);//执行修改
|
数据查询
数据查询相对前面几种方法就复杂一些了,因为查询会带有很多条件
通过query实现查询的
public Cursor query(String table, String[] columns, String selection, String[] selectionArgs, String groupBy, String having, String orderBy, String limit)
各参数说明:
- table:表名称
- colums:列名称数组
- selection:条件子句,相当于where
- selectionArgs:条件语句的参数数组
- groupBy:分组
- having:分组条件
- orderBy:排序类
- limit:分页查询的限制
- Cursor:返回值,相当于结果集ResultSet
针对游标(Cursor)也提供了不少方法
| 方法名称 | 方法描述 |
|---|---|
| getCount() | 总记录条数 |
| isFirst() | 判断是否第一条记录 |
| isLast() | 判断是否最后一条记录 |
| moveToFirst() | 移动到第一条记录 |
| moveToLast() | 移动到最后一条记录 |
| move(int offset) | 移动到指定的记录 |
| moveToNext() | 移动到吓一条记录 |
| moveToPrevious() | 移动到上一条记录 |
| getColumnIndex(String columnName) | 获得指定列索引的int类型值 |
实现代码
|
1
2
3
4
5
6
7
8
|
Cursor c = db.query("user",null,null,null,null,null,null);//查询并获得游标
if(c.moveToFirst()){//判断游标是否为空
for(int i=0;i<c.getCount();i++){
c.move(i);//移动到指定记录
String username = c.getString(c.getColumnIndex("username");
String password = c.getString(c.getColumnIndex("password"));
}
}
|
通过rawQuery实现的带参数查询
|
1
2
3
4
|
Cursor c = db.rawQuery("select * from user where username=?",new Stirng[]{"Jack Johnson"});
if(cursor.moveToFirst()) {
String password = c.getString(c.getColumnIndex("password"));
}
|
Android中SQLite应用详解
发布于:2014-7-22 9:35 作者:admin 浏览:2262 分类:Android现在的主流移动设备像Android、iPhone等都使用SQLite作为复杂数据的存储引擎,在我们为移动设备开发应用程序时,也许就要使用到SQLite来存储我们大量的数据,所以我们就需要掌握移动设备上的SQLite开发技巧。对于Android平台来说,系统内置了丰富的API来供开发人员操作SQLite,我们可以轻松的完成对数据的存取。
下面就向大家介绍一下SQLite常用的操作方法,为了方便,我将代码写在了Activity的onCreate中:
	@Override
	protected void onCreate(Bundle savedInstanceState) {
		super.onCreate(savedInstanceState);

		//打开或创建test.db数据库
		SQLiteDatabase db = openOrCreateDatabase("test.db", Context.MODE_PRIVATE, null);
		db.execSQL("DROP TABLE IF EXISTS person");
		//创建person表
		db.execSQL("CREATE TABLE person (_id INTEGER PRIMARY KEY AUTOINCREMENT, name VARCHAR, age SMALLINT)");
		Person person = new Person();
		person.name = "john";
		person.age = 30;
		//插入数据
		db.execSQL("INSERT INTO person VALUES (NULL, ?, ?)", new Object[]{person.name, person.age});

		person.name = "david";
		person.age = 33;
		//ContentValues以键值对的形式存放数据
		ContentValues cv = new ContentValues();
		cv.put("name", person.name);
		cv.put("age", person.age);
		//插入ContentValues中的数据
		db.insert("person", null, cv);

		cv = new ContentValues();
		cv.put("age", 35);
		//更新数据
		db.update("person", cv, "name = ?", new String[]{"john"});

		Cursor c = db.rawQuery("SELECT * FROM person WHERE age >= ?", new String[]{"33"});
		while (c.moveToNext()) {
			int _id = c.getInt(c.getColumnIndex("_id"));
			String name = c.getString(c.getColumnIndex("name"));
			int age = c.getInt(c.getColumnIndex("age"));
			Log.i("db", "_id=>" + _id + ", name=>" + name + ", age=>" + age);
		}
		c.close();

		//删除数据
		db.delete("person", "age < ?", new String[]{"35"});

		//关闭当前数据库
		db.close();

		//删除test.db数据库
//		deleteDatabase("test.db");
	}
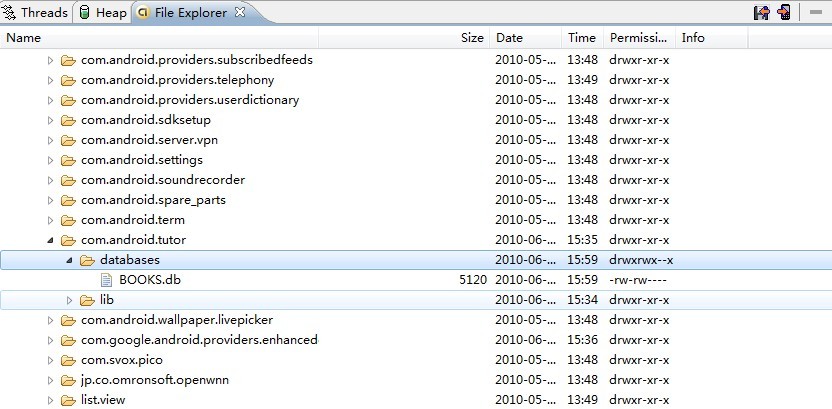
在执行完上面的代码后,系统就会在/data/data/[PACKAGE_NAME]/databases目录下生成一个“test.db”的数据库文件,如图:
上面的代码中基本上囊括了大部分的数据库操作;对于添加、更新和删除来说,我们都可以使用
- db.executeSQL(String sql);
- db.executeSQL(String sql, Object[] bindArgs);//sql语句中使用占位符,然后第二个参数是实际的参数集
- db.insert(String table, String nullColumnHack, ContentValues values);
- db.update(String table, Contentvalues values, String whereClause, String whereArgs);
- db.delete(String table, String whereClause, String whereArgs);
下面来说说查询操作。查询操作相对于上面的几种操作要复杂些,因为我们经常要面对着各种各样的查询条件,所以系统也考虑到这种复杂性,为我们提供了较为丰富的查询形式:
- db.rawQuery(String sql, String[] selectionArgs);
- db.query(String table, String[] columns, String selection, String[] selectionArgs, String groupBy, String having, String orderBy);
- db.query(String table, String[] columns, String selection, String[] selectionArgs, String groupBy, String having, String orderBy, String limit);
- db.query(String distinct, String table, String[] columns, String selection, String[] selectionArgs, String groupBy, String having, String orderBy, String limit);
最后,他们同时返回一个Cursor对象,代表数据集的游标,有点类似于JavaSE中的ResultSet。
下面是Cursor对象的常用方法
- c.move(int offset); //以当前位置为参考,移动到指定行
- c.moveToFirst(); //移动到第一行
- c.moveToLast(); //移动到最后一行
- c.moveToPosition(int position); //移动到指定行
- c.moveToPrevious(); //移动到前一行
- c.moveToNext(); //移动到下一行
- c.isFirst(); //是否指向第一条
- c.isLast(); //是否指向最后一条
- c.isBeforeFirst(); //是否指向第一条之前
- c.isAfterLast(); //是否指向最后一条之后
- c.isNull(int columnIndex); //指定列是否为空(列基数为0)
- c.isClosed(); //游标是否已关闭
- c.getCount(); //总数据项数
- c.getPosition(); //返回当前游标所指向的行数
- c.getColumnIndex(String columnName);//返回某列名对应的列索引值
- c.getString(int columnIndex); //返回当前行指定列的值
在上面的代码示例中,已经用到了这几个常用方法中的一些,关于更多的信息,大家可以参考官方文档中的说明。
最后当我们完成了对数据库的操作后,记得调用SQLiteDatabase的close()方法释放数据库连接,否则容易出现SQLiteException。
上面就是SQLite的基本应用,但在实际开发中,为了能够更好的管理和维护数据库,我们会封装一个继承自SQLiteOpenHelper类的数据库操作类,然后以这个类为基础,再封装我们的业务逻辑方法。
下面,我们就以一个实例来讲解具体的用法,我们新建一个名为db的项目,结构如下:

其中DBHelper继承了SQLiteOpenHelper,作为维护和管理数据库的基类,DBManager是建立在DBHelper之上,封装了常用的业务方法,Person是我们的person表对应的JavaBean,MainActivity就是我们显示的界面。
下面我们先来看一下DBHelper:
- package com.scott.db;
- import android.content.Context;
- import android.database.sqlite.SQLiteDatabase;
- import android.database.sqlite.SQLiteOpenHelper;
- public class DBHelper extends SQLiteOpenHelper {
- private static final String DATABASE_NAME = "test.db";
- private static final int DATABASE_VERSION = 1;
- public DBHelper(Context context) {
- //CursorFactory设置为null,使用默认值
- super(context, DATABASE_NAME, null, DATABASE_VERSION);
- }
- //数据库第一次被创建时onCreate会被调用
- @Override
- public void onCreate(SQLiteDatabase db) {
- db.execSQL("CREATE TABLE IF NOT EXISTS person" +
- "(_id INTEGER PRIMARY KEY AUTOINCREMENT, name VARCHAR, age INTEGER, info TEXT)");
- }
- //如果DATABASE_VERSION值被改为2,系统发现现有数据库版本不同,即会调用onUpgrade
- @Override
- public void onUpgrade(SQLiteDatabase db, int oldVersion, int newVersion) {
- db.execSQL("ALTER TABLE person ADD COLUMN other STRING");
- }
- }
为了方便我们面向对象的使用数据,我们建一个Person类,对应person表中的字段,如下:
- package com.scott.db;
- public class Person {
- public int _id;
- public String name;
- public int age;
- public String info;
- public Person() {
- }
- public Person(String name, int age, String info) {
- this.name = name;
- this.age = age;
- this.info = info;
- }
- }
- package com.scott.db;
- import java.util.ArrayList;
- import java.util.List;
- import android.content.ContentValues;
- import android.content.Context;
- import android.database.Cursor;
- import android.database.sqlite.SQLiteDatabase;
- public class DBManager {
- private DBHelper helper;
- private SQLiteDatabase db;
- public DBManager(Context context) {
- helper = new DBHelper(context);
- //因为getWritableDatabase内部调用了mContext.openOrCreateDatabase(mName, 0, mFactory);
- //所以要确保context已初始化,我们可以把实例化DBManager的步骤放在Activity的onCreate里
- db = helper.getWritableDatabase();
- }
- /**
- * add persons
- * @param persons
- */
- public void add(List<Person> persons) {
- db.beginTransaction(); //开始事务
- try {
- for (Person person : persons) {
- db.execSQL("INSERT INTO person VALUES(null, ?, ?, ?)", new Object[]{person.name, person.age, person.info});
- }
- db.setTransactionSuccessful(); //设置事务成功完成
- } finally {
- db.endTransaction(); //结束事务
- }
- }
- /**
- * update person's age
- * @param person
- */
- public void updateAge(Person person) {
- ContentValues cv = new ContentValues();
- cv.put("age", person.age);
- db.update("person", cv, "name = ?", new String[]{person.name});
- }
- /**
- * delete old person
- * @param person
- */
- public void deleteOldPerson(Person person) {
- db.delete("person", "age >= ?", new String[]{String.valueOf(person.age)});
- }
- /**
- * query all persons, return list
- * @return List<Person>
- */
- public List<Person> query() {
- ArrayList<Person> persons = new ArrayList<Person>();
- Cursor c = queryTheCursor();
- while (c.moveToNext()) {
- Person person = new Person();
- person._id = c.getInt(c.getColumnIndex("_id"));
- person.name = c.getString(c.getColumnIndex("name"));
- person.age = c.getInt(c.getColumnIndex("age"));
- person.info = c.getString(c.getColumnIndex("info"));
- persons.add(person);
- }
- c.close();
- return persons;
- }
- /**
- * query all persons, return cursor
- * @return Cursor
- */
- public Cursor queryTheCursor() {
- Cursor c = db.rawQuery("SELECT * FROM person", null);
- return c;
- }
- /**
- * close database
- */
- public void closeDB() {
- db.close();
- }
- }
我们获取数据库实例时使用了getWritableDatabase()方法,也许朋友们会有疑问,在getWritableDatabase()和getReadableDatabase()中,你为什么选择前者作为整个应用的数据库实例呢?在这里我想和大家着重分析一下这一点。
我们来看一下SQLiteOpenHelper中的getReadableDatabase()方法:
- public synchronized SQLiteDatabase getReadableDatabase() {
- if (mDatabase != null && mDatabase.isOpen()) {
- // 如果发现mDatabase不为空并且已经打开则直接返回
- return mDatabase;
- }
- if (mIsInitializing) {
- // 如果正在初始化则抛出异常
- throw new IllegalStateException("getReadableDatabase called recursively");
- }
- // 开始实例化数据库mDatabase
- try {
- // 注意这里是调用了getWritableDatabase()方法
- return getWritableDatabase();
- } catch (SQLiteException e) {
- if (mName == null)
- throw e; // Can't open a temp database read-only!
- Log.e(TAG, "Couldn't open " + mName + " for writing (will try read-only):", e);
- }
- // 如果无法以可读写模式打开数据库 则以只读方式打开
- SQLiteDatabase db = null;
- try {
- mIsInitializing = true;
- String path = mContext.getDatabasePath(mName).getPath();// 获取数据库路径
- // 以只读方式打开数据库
- db = SQLiteDatabase.openDatabase(path, mFactory, SQLiteDatabase.OPEN_READONLY);
- if (db.getVersion() != mNewVersion) {
- throw new SQLiteException("Can't upgrade read-only database from version " + db.getVersion() + " to "
- + mNewVersion + ": " + path);
- }
- onOpen(db);
- Log.w(TAG, "Opened " + mName + " in read-only mode");
- mDatabase = db;// 为mDatabase指定新打开的数据库
- return mDatabase;// 返回打开的数据库
- } finally {
- mIsInitializing = false;
- if (db != null && db != mDatabase)
- db.close();
- }
- }
- public synchronized SQLiteDatabase getWritableDatabase() {
- if (mDatabase != null && mDatabase.isOpen() && !mDatabase.isReadOnly()) {
- // 如果mDatabase不为空已打开并且不是只读模式 则返回该实例
- return mDatabase;
- }
- if (mIsInitializing) {
- throw new IllegalStateException("getWritableDatabase called recursively");
- }
- // If we have a read-only database open, someone could be using it
- // (though they shouldn't), which would cause a lock to be held on
- // the file, and our attempts to open the database read-write would
- // fail waiting for the file lock. To prevent that, we acquire the
- // lock on the read-only database, which shuts out other users.
- boolean success = false;
- SQLiteDatabase db = null;
- // 如果mDatabase不为空则加锁 阻止其他的操作
- if (mDatabase != null)
- mDatabase.lock();
- try {
- mIsInitializing = true;
- if (mName == null) {
- db = SQLiteDatabase.create(null);
- } else {
- // 打开或创建数据库
- db = mContext.openOrCreateDatabase(mName, 0, mFactory);
- }
- // 获取数据库版本(如果刚创建的数据库,版本为0)
- int version = db.getVersion();
- // 比较版本(我们代码中的版本mNewVersion为1)
- if (version != mNewVersion) {
- db.beginTransaction();// 开始事务
- try {
- if (version == 0) {
- // 执行我们的onCreate方法
- onCreate(db);
- } else {
- // 如果我们应用升级了mNewVersion为2,而原版本为1则执行onUpgrade方法
- onUpgrade(db, version, mNewVersion);
- }
- db.setVersion(mNewVersion);// 设置最新版本
- db.setTransactionSuccessful();// 设置事务成功
- } finally {
- db.endTransaction();// 结束事务
- }
- }
- onOpen(db);
- success = true;
- return db;// 返回可读写模式的数据库实例
- } finally {
- mIsInitializing = false;
- if (success) {
- // 打开成功
- if (mDatabase != null) {
- // 如果mDatabase有值则先关闭
- try {
- mDatabase.close();
- } catch (Exception e) {
- }
- mDatabase.unlock();// 解锁
- }
- mDatabase = db;// 赋值给mDatabase
- } else {
- // 打开失败的情况:解锁、关闭
- if (mDatabase != null)
- mDatabase.unlock();
- if (db != null)
- db.close();
- }
- }
- }
看完上面的过程之后,大家或许就清楚了许多,如果不是在遇到磁盘空间已满等情况,getReadableDatabase()一般都会返回和getWritableDatabase()一样的数据库实例,所以我们在DBManager构造方法中使用getWritableDatabase()获取整个应用所使用的数据库实例是可行的。当然如果你真的担心这种情况会发生,那么你可以先用getWritableDatabase()获取数据实例,如果遇到异常,再试图用getReadableDatabase()获取实例,当然这个时候你获取的实例只能读不能写了。
最后,让我们看一下如何使用这些数据操作方法来显示数据,下面是MainActivity.java的布局文件和代码:
- <?xml version="1.0" encoding="utf-8"?>
- <LinearLayout xmlns:android="http://schemas.android.com/apk/res/android"
- android:orientation="vertical"
- android:layout_width="fill_parent"
- android:layout_height="fill_parent">
- <Button
- android:layout_width="fill_parent"
- android:layout_height="wrap_content"
- android:text="add"
- android:onClick="add"/>
- <Button
- android:layout_width="fill_parent"
- android:layout_height="wrap_content"
- android:text="update"
- android:onClick="update"/>
- <Button
- android:layout_width="fill_parent"
- android:layout_height="wrap_content"
- android:text="delete"
- android:onClick="delete"/>
- <Button
- android:layout_width="fill_parent"
- android:layout_height="wrap_content"
- android:text="query"
- android:onClick="query"/>
- <Button
- android:layout_width="fill_parent"
- android:layout_height="wrap_content"
- android:text="queryTheCursor"
- android:onClick="queryTheCursor"/>
- <ListView
- android:id="@+id/listView"
- android:layout_width="fill_parent"
- android:layout_height="wrap_content"/>
- </LinearLayout>
- package com.scott.db;
- import java.util.ArrayList;
- import java.util.HashMap;
- import java.util.List;
- import java.util.Map;
- import android.app.Activity;
- import android.database.Cursor;
- import android.database.CursorWrapper;
- import android.os.Bundle;
- import android.view.View;
- import android.widget.ListView;
- import android.widget.SimpleAdapter;
- import android.widget.SimpleCursorAdapter;
- public class MainActivity extends Activity {
- private DBManager mgr;
- private ListView listView;
- @Override
- public void onCreate(Bundle savedInstanceState) {
- super.onCreate(savedInstanceState);
- setContentView(R.layout.main);
- listView = (ListView) findViewById(R.id.listView);
- //初始化DBManager
- mgr = new DBManager(this);
- }
- @Override
- protected void onDestroy() {
- super.onDestroy();
- //应用的最后一个Activity关闭时应释放DB
- mgr.closeDB();
- }
- public void add(View view) {
- ArrayList<Person> persons = new ArrayList<Person>();
- Person person1 = new Person("Ella", 22, "lively girl");
- Person person2 = new Person("Jenny", 22, "beautiful girl");
- Person person3 = new Person("Jessica", 23, "sexy girl");
- Person person4 = new Person("Kelly", 23, "hot baby");
- Person person5 = new Person("Jane", 25, "a pretty woman");
- persons.add(person1);
- persons.add(person2);
- persons.add(person3);
- persons.add(person4);
- persons.add(person5);
- mgr.add(persons);
- }
- public void update(View view) {
- Person person = new Person();
- person.name = "Jane";
- person.age = 30;
- mgr.updateAge(person);
- }
- public void delete(View view) {
- Person person = new Person();
- person.age = 30;
- mgr.deleteOldPerson(person);
- }
- public void query(View view) {
- List<Person> persons = mgr.query();
- ArrayList<Map<String, String>> list = new ArrayList<Map<String, String>>();
- for (Person person : persons) {
- HashMap<String, String> map = new HashMap<String, String>();
- map.put("name", person.name);
- map.put("info", person.age + " years old, " + person.info);
- list.add(map);
- }
- SimpleAdapter adapter = new SimpleAdapter(this, list, android.R.layout.simple_list_item_2,
- new String[]{"name", "info"}, new int[]{android.R.id.text1, android.R.id.text2});
- listView.setAdapter(adapter);
- }
- public void queryTheCursor(View view) {
- Cursor c = mgr.queryTheCursor();
- startManagingCursor(c); //托付给activity根据自己的生命周期去管理Cursor的生命周期
- CursorWrapper cursorWrapper = new CursorWrapper(c) {
- @Override
- public String getString(int columnIndex) {
- //将简介前加上年龄
- if (getColumnName(columnIndex).equals("info")) {
- int age = getInt(getColumnIndex("age"));
- return age + " years old, " + super.getString(columnIndex);
- }
- return super.getString(columnIndex);
- }
- };
- //确保查询结果中有"_id"列
- SimpleCursorAdapter adapter = new SimpleCursorAdapter(this, android.R.layout.simple_list_item_2,
- cursorWrapper, new String[]{"name", "info"}, new int[]{android.R.id.text1, android.R.id.text2});
- ListView listView = (ListView) findViewById(R.id.listView);
- listView.setAdapter(adapter);
- }
- }
如果手动去管理Cursor的话会非常的麻烦,还有一定的风险,处理不当的话运行期间就会出现异常,幸好Activity为我们提供了startManagingCursor(Cursor cursor)方法,它会根据Activity的生命周期去管理当前的Cursor对象,下面是该方法的说明:
- /**
- * This method allows the activity to take care of managing the given
- * {@link Cursor}'s lifecycle for you based on the activity's lifecycle.
- * That is, when the activity is stopped it will automatically call
- * {@link Cursor#deactivate} on the given Cursor, and when it is later restarted
- * it will call {@link Cursor#requery} for you. When the activity is
- * destroyed, all managed Cursors will be closed automatically.
- *
- * @param c The Cursor to be managed.
- *
- * @see #managedQuery(android.net.Uri , String[], String, String[], String)
- * @see #stopManagingCursor
- */
如何包装Cursor:我们会使用到CursorWrapper对象去包装我们的Cursor对象,实现我们需要的数据转换工作,这个CursorWrapper实际上是实现了Cursor接口。我们查询获取到的Cursor其实是Cursor的引用,而系统实际返回给我们的必然是Cursor接口的一个实现类的对象实例,我们用CursorWrapper包装这个实例,然后再使用SimpleCursorAdapter将结果显示到列表上。
Cursor结果集需要注意些什么:一个最需要注意的是,在我们的结果集中必须要包含一个“_id”的列,否则SimpleCursorAdapter就会翻脸不认人,为什么一定要这样呢?因为这源于SQLite的规范,主键以“_id”为标准。解决办法有三:第一,建表时根据规范去做;第二,查询时用别名,例如:SELECT id AS _id FROM person;第三,在CursorWrapper里做文章:
- CursorWrapper cursorWrapper = new CursorWrapper(c) {
- @Override
- public int getColumnIndexOrThrow(String columnName) throws IllegalArgumentException {
- if (columnName.equals("_id")) {
- return super.getColumnIndex("id");
- }
- return super.getColumnIndexOrThrow(columnName);
- }
- };

android 参数含义
发布于:2014-7-21 13:38 作者:admin 浏览:2318android:layout_height 设置组件的高度
android:id 给组件定义一个id值,供后期使用
android:background 设置组件的背景颜色或背景图片
android:text 设置组件的显示文字
android:textColor 设置组件的显示文字的颜色
android:layout_below 组件在参考组件的下面
android:alignTop 同指定组件的顶平行
android:maxLength="6" 限制输入字数
android:digits='012356789abcdefghijklmnopqrstuvwxyzABCDEFGHIJKLMNOPQRSTUVWXYZ'限制输入数字和大写小写字母
1. 开发更简单,执行速度高效。 2. 输入法默认会根据情况变动,比如说设置为numeric后输入法会自动仅显示数字,不会出现Qwerty中的字母。
下面我们通过EditText的layout xml文件中的相关属性来实现:
1. 密码框属性 android:password='true' 这条可以让EditText显示的内容自动为 星号,输入时内容会在1秒内变成*字样。
2. 纯数字 android:numeric='true' 这条可以让输入法自动变为数字输入键盘,同时仅允许0-9的数字输入
3. 仅允许 android:capitalize='cwj1987' 这样仅允许接受输入cwj1987,一般用于密码验证
下面是一些扩展的风格属性
android:editable='false' 设置EditText不可编辑
android:singleLine='true' 强制输入的内容在单行
android:ellipsize='end' 自动隐藏尾部溢出数据,一般用于文字内容过长一行无法全部显示时。
android:autoLink
设置是否当文本为URL链接/email/电话号码/map时,文本显示为可点击的链接。可选值(none/web/email/phone/map/all)
android:autoText
如果设置,将自动执行输入值的拼写纠正。此处无效果,在显示输入法并输入的时候起作用。
android:bufferType
指定getText()方式取得的文本类别。选项editable 类似于StringBuilder可追加字符,
也就是说getText后可调用append方法设置文本内容。spannable 则可在给定的字符区域使用样式,参见这里1、这里2。
android:capitalize
设置英文字母大写类型。此处无效果,需要弹出输入法才能看得到,参见EditText此属性说明。
android:cursorVisible
设定光标为显示/隐藏,默认显示。
android:digits
设置允许输入哪些字符。如“1234567890.+-*/%\n()”
android:drawableBottom
在text的下方输出一个drawable,如图片。如果指定一个颜色的话会把text的背景设为该颜色,并且同时和background使用时覆盖后者。
android:drawableLeft
在text的左边输出一个drawable,如图片。
android:drawablePadding
设置text与drawable(图片)的间隔,与drawableLeft、drawableRight、drawableTop、drawableBottom一起使用,可设置为负数,单独使用没有效果。
android:drawableRight
在text的右边输出一个drawable,如图片。
android:drawableTop
在text的正上方输出一个drawable,如图片。
android:editable
设置是否可编辑。这里无效果,参见EditView。
android:editorExtras
设置文本的额外的输入数据。在EditView再讨论。
android:ellipsize
设置当文字过长时,该控件该如何显示。有如下值设置:”start”—–省略号显示在开头;”end”——省略号显示在结尾;”middle”—-省略号显示在中间;”marquee” ——以跑马灯的方式显示(动画横向移动)
android:freezesText
设置保存文本的内容以及光标的位置。参见:这里。
android:gravity
设置文本位置,如设置成“center”,文本将居中显示。
android:hint
Text为空时显示的文字提示信息,可通过textColorHint设置提示信息的颜色。此属性在EditView中使用,但是这里也可以用。
android:imeOptions
附加功能,设置右下角IME动作与编辑框相关的动作,如actionDone右下角将显示一个“完成”,而不设置默认是一个回车符号。这个在EditText中再详细说明,此处无用。
android:imeActionId
设置IME动作ID。在EditText再做说明,可以先看这篇帖子:这里。
android:imeActionLabel
设置IME动作标签。在EditText再做说明。
android:includeFontPadding
设置文本是否包含顶部和底部额外空白,默认为true。
android:inputMethod
为文本指定输入法,需要完全限定名(完整的包名)。例如:com.google.android.inputmethod.pinyin,但是这里报错找不到。
android:inputType
设置文本的类型,用于帮助输入法显示合适的键盘类型。在EditText中再详细说明,这里无效果。
android:linksClickable
设置链接是否点击连接,即使设置了autoLink。
android:marqueeRepeatLimit
在ellipsize指定marquee的情况下,设置重复滚动的次数,当设置为marquee_forever时表示无限次。
android:ems
设置TextView的宽度为N个字符的宽度。这里测试为一个汉字字符宽度,如图:
android:maxEms
设置TextView的宽度为最长为N个字符的宽度。与ems同时使用时覆盖ems选项。
android:minEms
设置TextView的宽度为最短为N个字符的宽度。与ems同时使用时覆盖ems选项。
android:maxLength
限制显示的文本长度,超出部分不显示。
android:lines
设置文本的行数,设置两行就显示两行,即使第二行没有数据。
android:maxLines
设置文本的最大显示行数,与width或者layout_width结合使用,超出部分自动换行,超出行数将不显示。
android:minLines
设置文本的最小行数,与lines类似。
android:lineSpacingExtra
设置行间距。
android:lineSpacingMultiplier
设置行间距的倍数。如”1.2”
android:numeric
如果被设置,该TextView有一个数字输入法。此处无用,设置后唯一效果是TextView有点击效果,此属性在EditText将详细说明。
android:password
以小点”.”显示文本
android:phoneNumber
设置为电话号码的输入方式。
android:privateImeOptions
设置输入法选项,此处无用,在EditText将进一步讨论。
android:scrollHorizontally
设置文本超出TextView的宽度的情况下,是否出现横拉条。
android:selectAllOnFocus
如果文本是可选择的,让他获取焦点而不是将光标移动为文本的开始位置或者末尾位置。EditText中设置后无效果。
android:shadowColor
指定文本阴影的颜色,需要与shadowRadius一起使用。效果:
android:shadowDx
设置阴影横向坐标开始位置。
android:shadowDy
设置阴影纵向坐标开始位置。
android:shadowRadius
设置阴影的半径。设置为0.1就变成字体的颜色了,一般设置为3.0的效果比较好。
android:singleLine
设置单行显示。如果和layout_width一起使用,当文本不能全部显示时,后面用“…”来表示。如android:text="test_ singleLine " android:singleLine="true" android:layout_width="20dp"将只显示“t…”。如果不设置singleLine或者设置为false,文本将自动换行
android:text
设置显示文本.
android:textAppearance
设置文字外观。如“?android:attr/textAppearanceLargeInverse
”这里引用的是系统自带的一个外观,?表示系统是否有这种外观,否则使用默认的外观。可设置的值如下:textAppearanceButton/textAppearanceInverse/textAppearanceLarge/textAppearanceLargeInverse/textAppearanceMedium/textAppearanceMediumInverse/textAppearanceSmall/textAppearanceSmallInverse
android:textColor
设置文本颜色
android:textColorHighlight
被选中文字的底色,默认为蓝色
android:textColorHint
设置提示信息文字的颜色,默认为灰色。与hint一起使用。
android:textColorLink
文字链接的颜色.
android:textScaleX
设置文字之间间隔,默认为1.0f。分别设置0.5f/1.0f/1.5f/2.0f效果如下:
android:textSize
设置文字大小,推荐度量单位”sp”,如”15sp”
android:textStyle
设置字形[bold(粗体) 0, italic(斜体) 1, bolditalic(又粗又斜) 2] 可以设置一个或多个,用“|”隔开
android:typeface
设置文本字体,必须是以下常量值之一:normal 0, sans 1, serif 2, monospace(等宽字体) 3]
android:height
设置文本区域的高度,支持度量单位:px(像素)/dp/sp/in/mm(毫米)
android:maxHeight
设置文本区域的最大高度
android:minHeight
设置文本区域的最小高度
android:width
设置文本区域的宽度,支持度量单位:px(像素)/dp/sp/in/mm(毫米),与layout_width的区别看这里。
android:maxWidth
设置文本区域的最大宽度
android:minWidth
设置文本区域的最小宽度
Android Notification通知详解
发布于:2014-7-18 9:38 作者:admin 浏览:2235 分类:Android根据activity的生命周期,在activity不显示时,会执行onStop函数(比如按下home键),所以你在onStop函数(按退出键除外)里面把notification放在通知栏里,再此显示时,把notification从通知栏里去掉。或者,只要程序在运行就一直显示通知栏图标。
下面对Notification类中的一些常量,字段,方法简单介绍一下:
常量:
DEFAULT_ALL 使用所有默认值,比如声音,震动,闪屏等等
DEFAULT_LIGHTS 使用默认闪光提示
DEFAULT_SOUNDS 使用默认提示声音
DEFAULT_VIBRATE 使用默认手机震动
【说明】:加入手机震动,一定要在manifest.xml中加入权限:
<uses-permission android:name="android.permission.VIBRATE" />
以上的效果常量可以叠加,即通过
notification.defaults =DEFAULT_SOUND|DEFAULT_VIBRATE;
notification.defaults |= DEFAULT_SOUND (最好在真机上测试,震动效果模拟器上没有)
//设置flag位
FLAG_AUTO_CANCEL 该通知能被状态栏的清除按钮给清除掉
FLAG_NO_CLEAR 该通知能被状态栏的清除按钮给清除掉
FLAG_ONGOING_EVENT 通知放置在正在运行
FLAG_INSISTENT 是否一直进行,比如音乐一直播放,知道用户响应
常用字段:
contentIntent 设置PendingIntent对象,点击时发送该Intent
defaults 添加默认效果
flags 设置flag位,例如FLAG_NO_CLEAR等
icon 设置图标
sound 设置声音
tickerText 显示在状态栏中的文字
when 发送此通知的时间戳
NotificationManager常用方法介绍:
public void cancelAll() 移除所有通知(只是针对当前Context下的Notification)
public void cancel(int id) 移除标记为id的通知 (只是针对当前Context下的所有Notification)
public void notify(String tag ,int id, Notification notification) 将通知加入状态栏,标签为tag,标记为id
public void notify(int id, Notification notification) 将通知加入状态栏,标记为id
package com.ljq.activity;
import android.app.Activity;
import android.app.Notification;
import android.app.NotificationManager;
import android.app.PendingIntent;
import android.content.Intent;
import android.graphics.Color;
import android.os.Bundle;
public class MainActivity extends Activity {
/** Called when the activity is first created. */
@Override
public void onCreate(Bundle savedInstanceState) {
super.onCreate(savedInstanceState);
setContentView(R.layout.main);
clearNotification();
}
@Override
protected void onStop() {
showNotification();
super.onStop();
}
@Override
protected void onStart() {
clearNotification();
super.onStart();
}
/**
* 在状态栏显示通知
*/
private void showNotification(){
// 创建一个NotificationManager的引用
NotificationManager notificationManager = (NotificationManager)
this.getSystemService(android.content.Context.NOTIFICATION_SERVICE);
// 定义Notification的各种属性
Notification notification =new Notification(R.drawable.icon,
"督导系统", System.currentTimeMillis());
//FLAG_AUTO_CANCEL 该通知能被状态栏的清除按钮给清除掉
//FLAG_NO_CLEAR 该通知不能被状态栏的清除按钮给清除掉
//FLAG_ONGOING_EVENT 通知放置在正在运行
//FLAG_INSISTENT 是否一直进行,比如音乐一直播放,知道用户响应
notification.flags |= Notification.FLAG_ONGOING_EVENT; // 将此通知放到通知栏的"Ongoing"即"正在运行"组中
notification.flags |= Notification.FLAG_NO_CLEAR; // 表明在点击了通知栏中的"清除通知"后,此通知不清除,经常与FLAG_ONGOING_EVENT一起使用
notification.flags |= Notification.FLAG_SHOW_LIGHTS;
//DEFAULT_ALL 使用所有默认值,比如声音,震动,闪屏等等
//DEFAULT_LIGHTS 使用默认闪光提示
//DEFAULT_SOUNDS 使用默认提示声音
//DEFAULT_VIBRATE 使用默认手机震动,需加上<uses-permission android:name="android.permission.VIBRATE" />权限
notification.defaults = Notification.DEFAULT_LIGHTS;
//叠加效果常量
//notification.defaults=Notification.DEFAULT_LIGHTS|Notification.DEFAULT_SOUND;
notification.ledARGB = Color.BLUE;
notification.ledOnMS =5000; //闪光时间,毫秒
// 设置通知的事件消息
CharSequence contentTitle ="督导系统标题"; // 通知栏标题
CharSequence contentText ="督导系统内容"; // 通知栏内容
Intent notificationIntent =new Intent(MainActivity.this, MainActivity.class); // 点击该通知后要跳转的Activity
PendingIntent contentItent = PendingIntent.getActivity(this, 0, notificationIntent, 0);
notification.setLatestEventInfo(this, contentTitle, contentText, contentItent);
// 把Notification传递给NotificationManager
notificationManager.notify(0, notification);
}
?
//删除通知
private void clearNotification(){
// 启动后删除之前我们定义的通知
NotificationManager notificationManager = (NotificationManager) this
.getSystemService(NOTIFICATION_SERVICE);
notificationManager.cancel(0);
}
}android intent和intent action大全
发布于:2014-7-18 8:30 作者:admin 浏览:5559 分类:Android(1)用Action跳转
Intent i = new Intent(Intent.ACTION_VIEW,uri);手机的Intent分发过程中,会根据http://www.google.com 的scheme判断出数据类型type 。手机的Brower则能匹配它,在Brower的Manifest.xml中的IntenFilter中 首先有ACTION_VIEW Action,也能处理http:的type,
intent.setClass(context, targetActivy.class);
//或者直接用 Intent intent = new Intent(context, targetActivity.class);
★intent大全:
1.从google搜索内容
Intent intent = new Intent();
intent.setAction(Intent.ACTION_WEB_SEARCH);
intent.putExtra(SearchManager.QUERY,"searchString")
startActivity(intent);
2.浏览网页
Uri uri = Uri.parse("http://www.google.com");
Intent it = new Intent(Intent.ACTION_VIEW,uri);
startActivity(it);
3.显示地图
Uri uri = Uri.parse("geo:38.899533,-77.036476");
Intent it = new Intent(Intent.Action_VIEW,uri);
startActivity(it);
4.路径规划
Uri uri = Uri.parse("http://maps.google.com/maps?f=dsaddr=startLat%20startLng&daddr=endLat%20endLng&hl=en");
Intent it = new Intent(Intent.ACTION_VIEW,URI);
startActivity(it);
5.拨打电话
Uri uri = Uri.parse("tel:xxxxxx");
Intent it = new Intent(Intent.ACTION_DIAL, uri);
startActivity(it);
6.调用发短信的程序
Intent it = new Intent(Intent.ACTION_VIEW);
it.putExtra("sms_body", "The SMS text");
it.setType("vnd.android-dir/mms-sms");
startActivity(it);
7.发送短信
Uri uri = Uri.parse("smsto:0800000123");
Intent it = new Intent(Intent.ACTION_SENDTO, uri);
it.putExtra("sms_body", "The SMS text");
startActivity(it);
String body="this is sms demo";
Intent mmsintent = new Intent(Intent.ACTION_SENDTO, Uri.fromParts("smsto", number, null));
mmsintent.putExtra(Messaging.KEY_ACTION_SENDTO_MESSAGE_BODY, body);
mmsintent.putExtra(Messaging.KEY_ACTION_SENDTO_COMPOSE_MODE, true);
mmsintent.putExtra(Messaging.KEY_ACTION_SENDTO_EXIT_ON_SENT, true);
startActivity(mmsintent);
8.发送彩信
Uri uri = Uri.parse("content://media/external/images/media/23");
Intent it = new Intent(Intent.ACTION_SEND);
it.putExtra("sms_body", "some text");
it.putExtra(Intent.EXTRA_STREAM, uri);
it.setType("image/png");
startActivity(it);
StringBuilder sb = new StringBuilder();
sb.append("file://");
sb.append(fd.getAbsoluteFile());
Intent intent = new Intent(Intent.ACTION_SENDTO, Uri.fromParts("mmsto", number, null));
// Below extra datas are all optional.
intent.putExtra(Messaging.KEY_ACTION_SENDTO_MESSAGE_SUBJECT, subject);
intent.putExtra(Messaging.KEY_ACTION_SENDTO_MESSAGE_BODY, body);
intent.putExtra(Messaging.KEY_ACTION_SENDTO_CONTENT_URI, sb.toString());
intent.putExtra(Messaging.KEY_ACTION_SENDTO_COMPOSE_MODE, composeMode);
intent.putExtra(Messaging.KEY_ACTION_SENDTO_EXIT_ON_SENT, exitOnSent);
startActivity(intent);
9.发送Email
Uri uri = Uri.parse("mailto:xxx@abc.com");
Intent it = new Intent(Intent.ACTION_SENDTO, uri);
startActivity(it);
Intent it = new Intent(Intent.ACTION_SEND);
it.putExtra(Intent.EXTRA_EMAIL, "me@abc.com");
it.putExtra(Intent.EXTRA_TEXT, "The email body text");
it.setType("text/plain");
startActivity(Intent.createChooser(it, "Choose Email Client"));
Intent it=new Intent(Intent.ACTION_SEND);
String[] tos={"me@abc.com"};
String[] ccs={"you@abc.com"};
it.putExtra(Intent.EXTRA_EMAIL, tos);
it.putExtra(Intent.EXTRA_CC, ccs);
it.putExtra(Intent.EXTRA_TEXT, "The email body text");
it.putExtra(Intent.EXTRA_SUBJECT, "The email subject text");
it.setType("message/rfc822");
startActivity(Intent.createChooser(it, "Choose Email Client"));
Intent it = new Intent(Intent.ACTION_SEND);
it.putExtra(Intent.EXTRA_SUBJECT, "The email subject text");
it.putExtra(Intent.EXTRA_STREAM, "file:///sdcard/mysong.mp3");
sendIntent.setType("audio/mp3");
startActivity(Intent.createChooser(it, "Choose Email Client"));
10.播放多媒体
Intent it = new Intent(Intent.ACTION_VIEW);
Uri uri = Uri.parse("file:///sdcard/song.mp3");
it.setDataAndType(uri, "audio/mp3");
startActivity(it);
Uri uri = Uri.withAppendedPath(MediaStore.Audio.Media.INTERNAL_CONTENT_URI, "1");
Intent it = new Intent(Intent.ACTION_VIEW, uri);
startActivity(it);
11.uninstall apk
Uri uri = Uri.fromParts("package", strPackageName, null);
Intent it = new Intent(Intent.ACTION_DELETE, uri);
startActivity(it);
12.install apk
Uri installUri = Uri.fromParts("package", "xxx", null);
returnIt = new Intent(Intent.ACTION_PACKAGE_ADDED, installUri);
13. 打开照相机
<1>Intent i = new Intent(Intent.ACTION_CAMERA_BUTTON, null);
this.sendBroadcast(i);
<2>long dateTaken = System.currentTimeMillis();
String name = createName(dateTaken) + ".jpg";
fileName = folder + name;
ContentValues values = new ContentValues();
values.put(Images.Media.TITLE, fileName);
values.put("_data", fileName);
values.put(Images.Media.PICASA_ID, fileName);
values.put(Images.Media.DISPLAY_NAME, fileName);
values.put(Images.Media.DESCRIPTION, fileName);
values.put(Images.ImageColumns.BUCKET_DISPLAY_NAME, fileName);
Uri photoUri = getContentResolver().insert(
MediaStore.Images.Media.EXTERNAL_CONTENT_URI, values);
Intent inttPhoto = new Intent(MediaStore.ACTION_IMAGE_CAPTURE);
inttPhoto.putExtra(MediaStore.EXTRA_OUTPUT, photoUri);
startActivityForResult(inttPhoto, 10);
14.从gallery选取图片
Intent i = new Intent();
i.setType("image/*");
i.setAction(Intent.ACTION_GET_CONTENT);
startActivityForResult(i, 11);
15. 打开录音机
Intent mi = new Intent(Media.RECORD_SOUND_ACTION);
startActivity(mi);
16.显示应用详细列表
Uri uri = Uri.parse("market://details?id=app_id");
Intent it = new Intent(Intent.ACTION_VIEW, uri);
startActivity(it);
//where app_id is the application ID, find the ID
//by clicking on your application on Market home
//page, and notice the ID from the address bar
刚才找app id未果,结果发现用package name也可以
Uri uri = Uri.parse("market://details?id=<packagename>");
这个简单多了
17寻找应用
Uri uri = Uri.parse("market://search?q=pname:pkg_name");
Intent it = new Intent(Intent.ACTION_VIEW, uri);
startActivity(it);
//where pkg_name is the full package path for an application
18打开联系人列表
<1>
Intent i = new Intent();
i.setAction(Intent.ACTION_GET_CONTENT);
i.setType("vnd.android.cursor.item/phone");
startActivityForResult(i, REQUEST_TEXT);
<2>
Uri uri = Uri.parse("content://contacts/people");
Intent it = new Intent(Intent.ACTION_PICK, uri);
startActivityForResult(it, REQUEST_TEXT);
19 打开另一程序
Intent i = new Intent();
ComponentName cn = new ComponentName("com.yellowbook.android2",
"com.yellowbook.android2.AndroidSearch");
i.setComponent(cn);
i.setAction("android.intent.action.MAIN");
startActivityForResult(i, RESULT_OK);
Intent it = newIntent(Intent.ACTION_INSERT_OR_EDIT);
it.setType("vnd.android.cursor.item/contact");
//it.setType(Contacts.CONTENT_ITEM_TYPE);
it.putExtra("name","myName");
it.putExtra(android.provider.Contacts.Intents.Insert.COMPANY, "organization");
it.putExtra(android.provider.Contacts.Intents.Insert.EMAIL,"email");
it.putExtra(android.provider.Contacts.Intents.Insert.PHONE,"homePhone");
it.putExtra(android.provider.Contacts.Intents.Insert.SECONDARY_PHONE,
"mobilePhone");
it.putExtra( android.provider.Contacts.Intents.Insert.TERTIARY_PHONE,
"workPhone");
it.putExtra(android.provider.Contacts.Intents.Insert.JOB_TITLE,"title");
startActivity(it);
21.调用系统编辑添加联系人(全有效):
Intent intent = newIntent(Intent.ACTION_INSERT_OR_EDIT);
intent.setType(People.CONTENT_ITEM_TYPE);
intent.putExtra(Contacts.Intents.Insert.NAME, "My Name");
intent.putExtra(Contacts.Intents.Insert.PHONE, "+1234567890");
intent.putExtra(Contacts.Intents.Insert.PHONE_TYPE,Contacts.PhonesColumns.TYPE_MOBILE);
intent.putExtra(Contacts.Intents.Insert.EMAIL, "com@com.com");
intent.putExtra(Contacts.Intents.Insert.EMAIL_TYPE,
startActivity(intent);
★intent action大全:
- android.intent.action.ALL_APPS
- android.intent.action.ANSWER
- android.intent.action.ATTACH_DATA
- android.intent.action.BUG_REPORT
- android.intent.action.CALL
- android.intent.action.CALL_BUTTON
- android.intent.action.CHOOSER
- android.intent.action.CREATE_LIVE_FOLDER
- android.intent.action.CREATE_SHORTCUT
- android.intent.action.DELETE
- android.intent.action.DIAL
- android.intent.action.EDIT
- android.intent.action.GET_CONTENT
- android.intent.action.INSERT
- android.intent.action.INSERT_OR_EDIT
- android.intent.action.MAIN
- android.intent.action.MEDIA_SEARCH
- android.intent.action.PICK
- android.intent.action.PICK_ACTIVITY
- android.intent.action.RINGTONE_PICKER
- android.intent.action.RUN
- android.intent.action.SEARCH
- android.intent.action.SEARCH_LONG_PRESS
- android.intent.action.SEND
- android.intent.action.SENDTO
- android.intent.action.SET_WALLPAPER
- android.intent.action.SYNC
- android.intent.action.SYSTEM_TUTORIAL
- android.intent.action.VIEW
- android.intent.action.VOICE_COMMAND
- android.intent.action.WEB_SEARCH
- android.net.wifi.PICK_WIFI_NETWORK
- android.settings.AIRPLANE_MODE_SETTINGS
- android.settings.APN_SETTINGS
- android.settings.APPLICATION_DEVELOPMENT_SETTINGS
- android.settings.APPLICATION_SETTINGS
- android.settings.BLUETOOTH_SETTINGS
- android.settings.DATA_ROAMING_SETTINGS
- android.settings.DATE_SETTINGS
- android.settings.DISPLAY_SETTINGS
- android.settings.INPUT_METHOD_SETTINGS
- android.settings.INTERNAL_STORAGE_SETTINGS
- android.settings.LOCALE_SETTINGS
- android.settings.LOCATION_SOURCE_SETTINGS
- android.settings.MANAGE_APPLICATIONS_SETTINGS
- android.settings.MEMORY_CARD_SETTINGS
- android.settings.NETWORK_OPERATOR_SETTINGS
- android.settings.QUICK_LAUNCH_SETTINGS
- android.settings.SECURITY_SETTINGS
- android.settings.SETTINGS
- android.settings.SOUND_SETTINGS
- android.settings.SYNC_SETTINGS
- android.settings.USER_DICTIONARY_SETTINGS
- android.settings.WIFI_IP_SETTINGS
- android.settings.WIFI_SETTINGS
- android.settings.WIRELESS_SETTINGS
附录:
|
String |
"android.intent.action.ADD_SHORTCUT" |
动作:在系统中添加一个快捷方式。. |
|
String |
"android.intent.action.ALL_APPS" |
动作:列举所有可用的应用。 |
|
String |
"android.intent.action.ANSWER" |
动作:处理拨入的电话。 |
|
String |
"android.intent.action.BUG_REPORT" |
动作:显示 activity 报告错误。 |
|
String |
"android.intent.action.CALL" |
动作:拨打电话,被呼叫的联系人在数据中指定。 |
|
String |
"android.intent.action.CLEAR_CREDENTIALS" |
动作:清除登陆凭证 (credential)。 |
|
String |
"android.intent.action.VIEW" |
动作:和 VIEW_ACTION 相同,是在数据上执行的标准动作。 |
|
String |
"android.intent.action.DELETE" |
动作:从容器中删除给定的数据。 |
|
String |
"android.intent.action.DIAL" |
动作:拨打数据中指定的电话号码。 |
|
String |
"android.intent.action.EDIT" |
动作:为制定的数据显示可编辑界面。 |
|
String |
"android.intent.action.EMERGENCY_DIAL" |
动作:拨打紧急电话号码。 |
|
String |
"android.intent.action.LOGIN" |
动作:获取登录凭证。 |
|
String |
"android.intent.action.MAIN" |
动作:作为主入口点启动,不需要数据。 |
|
String |
"android.intent.action.PICK" |
动作:从数据中选择一个项目item,将被选中的项目返回。 |
|
String |
"android.intent.action.PICK_ACTIVITY" |
动作:选择一个activity,返回被选择的activity的类名 |
|
String |
"android.intent.action.RUN" |
动作:运行数据(指定的应用),无论它(应用)是什么。 |
|
String |
"android.intent.action.SENDTO" |
动作:向 data 指定的接收者发送一个消息。 |
|
String |
"android.intent.action.GET_CONTENT" |
动作:让用户选择数据并返回。 |
|
String |
"android.intent.action.INSERT" |
动作:在容器中插入一个空项 (item)。 |
|
String |
"android.intent.action.SETTINGS" |
动作:显示系统设置。输入:无。 |
|
String |
"android.intent.action.VIEW" |
动作:向用户显示数据。 |
|
String |
"android.intent.action.WALLPAPER_SETTINGS" |
动作:显示选择墙纸的设置界面。输入:无。 |
|
String |
"android.intent.action.WEB_SEARCH" |
动作:执行 web 搜索。 |
|
String |
"android.intent.action.SYNC" |
动作:执行数据同步。 |
|
String |
"android.intent.action.SERVICE_STATE" |
广播:电话服务的状态已经改变。 |
|
String |
"android.intent.action.TIMEZONE_CHANGED" |
广播:时区已经改变。 |
|
String |
"android.intent.action.TIME_SET" |
广播:时间已经改变(重新设置)。 |
|
String |
"android.intent.action.TIME_TICK" |
广播:当前时间已经变化(正常的时间流逝)。 |
|
String |
"android.intent.action.UMS_CONNECTED" |
广播:设备进入 USB 大容量存储模式。 |
|
String |
"android.intent.action.UMS_DISCONNECTED" |
广播:设备从 USB 大容量存储模式退出。 |
|
String |
"android.intent.action.WALLPAPER_CHANGED" |
广播:系统的墙纸已经改变。 |
|
String |
"android.intent.action.XMPP_CONNECTED" |
广播:XMPP 连接已经被建立。 |
|
String |
"android.intent.action.XMPP_DI |
广播:XMPP 连接已经被断开。 |
|
String |
"android.intent.action.SIG_STR" |
广播:电话的信号强度已经改变。 |
|
String |
"android.intent.action.BATTERY_CHANGED" |
广播:充电状态,或者电池的电量发生变化。 |
|
String |
"android.intent.action.BOOT_COMPLETED" |
广播:在系统启动后,这个动作被广播一次(只有一次) |
|
String |
"android.intent.action.DATA_ACTIVITY" |
广播:电话的数据活动(data activity)状态已经改变 |
|
String |
"android.intent.action.DATA_STATE" |
广播:电话的数据连接状态已经改变。 |
|
String |
"android.intent.action.DATE_CHANGED" |
广播:日期被改变。 |
|
String |
"android.server.checkin.FOTA_CANCEL" |
广播:取消所有被挂起的 (pending) 更新下载。 |
|
String |
"android.server.checkin.FOTA_INSTALL" |
广播:更新已经被确认,马上就要开始安装。 |
|
String |
"android.server.checkin.FOTA_READY" |
广播:更新已经被下载,可以开始安装。 |
|
String |
"android.server.checkin.FOTA_RESTART" |
广播:恢复已经停止的更新下载。 |
|
String |
"android.server.checkin.FOTA_UPDATE" |
广播:通过 OTA 下载并安装操作系统更新。 |
|
String |
"android.intent.action.MEDIABUTTON" |
广播:用户按下了“Media Button”。 |
|
String |
"android.intent.action.MEDIA_BAD_REMOVAL" |
广播:扩展卡从SD卡插槽拔出,但是挂载点还没unmount。 |
|
String |
"android.intent.action.MEDIA_EJECT" |
广播:用户想要移除扩展介质(拔掉扩展卡)。 |
|
String |
"android.intent.action.MEDIA_MOUNTED" |
广播:扩展介质被插入,而且已经被挂载。 |
|
String |
"android.intent.action.MEDIA_REMOVED" |
广播:扩展介质被移除。 |
|
String |
"android.intent.action.MEDIA_SCANNER_FINISHED" |
广播:已经扫描完介质的一个目录。 |
|
String |
"android.intent.action.MEDIA_SCANNER_STARTED" |
广播:开始扫描介质的一个目录。 |
|
String |
"android.intent.action.MEDIA_SHARED" |
广播:扩展介质的挂载被解除 (unmount) |
|
String |
"android.intent.action.MEDIA_UNMOUNTED" |
广播:扩展介质存在,但是还没有被挂载 (mount)。 |
|
String |
"android.intent.action.MWI" |
广播:电话的消息等待(语音邮件)状态已经改变。 |
|
String |
"android.intent.action.PACKAGE_ADDED" |
广播:设备上新安装了一个应用程序包。 |
|
String |
"android.intent.action.PACKAGE_REMOVED" |
广播:设备上删除了一个应用程序包。 |
|
String |
"android.intent.action.PHONE_STATE" |
广播:电话状态已经改变。 |
|
String |
"android.intent.action.PROVIDER_CHANGED" |
广播:更新将要(真正)被安装。 |
|
String |
"android.intent.action.PROVISIONING_CHECK" |
广播:要求provisioning service下载最新的设置 |
|
String |
"android.intent.action.SCREEN_OFF" |
广播:屏幕被关闭。 |
|
String |
"android.intent.action.SCREEN_ON" |
广播:屏幕已经被打开。 |
|
String |
"android.intent.action.NETWORK_TICKLE_RECEIVED" |
广播:设备收到了新的网络 "tickle" 通知。 |
|
String |
"android.intent.action.STATISTICS_REPORT" |
广播:要求 receivers 报告自己的统计信息。 |
|
String |
"android.intent.action.STATISTICS_STATE_CHANGED" |
广播:统计信息服务的状态已经改变。 |
|
String |
"android.intent.action.CFF" |
广播:语音电话的呼叫转移状态已经改变。 |
|
String |
"android.intent.action.CONFIGURATION_CHANGED" |
广播:设备的配置信息已经改变,参见 Resources.Configuration |
|
String |
"android.intent.category.ALTERNATIVE" |
类别:说明activity是用户正在浏的数据的一个可选操作。 |
|
String |
"android.intent.category.WALLPAPER" |
类别:这个 activity 能过为设备设置墙纸。 |
|
String |
"android.intent.category.UNIT_TEST" |
类别:应该被用作单元测试(通过 test harness 运行)。 |
|
String |
"android.intent.category.TEST" |
类别:作为测试目的使用,不是正常的用户体验的一部分。 |
|
String |
"android.intent.category.TAB" |
类别:activity应该在TabActivity中作为一个tab使用 |
|
String |
"android.intent.category.SAMPLE_CODE" |
类别:To be used as an sample code example (not part of the normal user experience). |
|
String |
"android.intent.category.PREFERENCE" |
类别:activity是一个设置面板 (preference panel)。 |
|
String |
"android.intent.category.HOME" |
类别:主屏幕 (activity),设备启动后显示的第一个 activity。 |
|
String |
"android.intent.category.BROWSABLE" |
类别:能够被浏览器安全使用的 activities 必须支持这个类别。 |
|
String |
"android.intent.category.DEFAULT" |
类别:如果 activity 是对数据执行确省动作(点击, center press)的一个选项,需要设置这个类别。 |
|
String |
"android.intent.category.DEVELOPMENT_PREFERENCE" |
类别:说明 activity 是一个设置面板 (development preference panel). |
|
String |
"android.intent.category.EMBED" |
类别:能够在上级(父)activity 中运行。 |
|
String |
"android.intent.category. |
类别:To be used as code under test for framework instrumentation tests. |
|
String |
"android.intent.category.GADGET" |
类别:这个 activity 可以被嵌入宿主 activity (activity that is hosting gadgets)。 |
|
String |
"android.intent.category.LAUNCHER" |
类别:Activity 应该被显示在顶级的 launcher 中。 |
|
String |
"android.intent.category.SELECTED_ALTERNATIVE" |
类别:对于被用户选中的数据,activity 是它的一个可选操作。 |
|
int |
8 0x00000008 |
启动标记:和 NEW_TASK_LAUNCH 联合使用,禁止将已有的任务改变为前景任务 (foreground)。 |
|
int |
4 0x00000004 |
启动标记:设置以后,activity 将成为历史堆栈中的第一个新任务(栈顶)。 |
|
int |
1 0x00000001 |
启动标记:设置以后,新的 activity 不会被保存在历史堆栈中。 |
|
int |
2 0x00000002 |
启动标记:设置以后,如果 activity 已经启动,而且位于历史堆栈的顶端,将不再启动(不重新启动) activity。 |
|
int |
16 0x00000010 |
启动标记:如果这个标记被设置,而且被一个已经存在的 activity 用来启动新的 activity,已有 activity 的回复目标 (reply target) 会被转移给新的 activity。 |
|
String |
"android.intent.extra.INTENT" |
附加数据:和 PICK_ACTIVITY_ACTION 一起使用时,说明用户选择的用来显示的 activity;和 ADD_SHORTCUT_ACTION 一起使用的时候,描述要添加的快捷方式。 |
|
String |
"android.intent.extra.LABEL" |
附加数据:大写字母开头的字符标签,和 ADD_SHORTCUT_ACTION 一起使用。 |
|
String |
"android.intent.extra.TEMPLATE" |
附加数据:新记录的初始化模板。 |
|
Creator |
无 |
无 |
